

How Power Automate carries a file
Power Automate does not have a native binary type. A file travelling through a flow is a JSON object with two properties: a content type and the bytes encoded as base64.file/body.$content-type and file/body.$content under the Nitro step’s
inputs.
Nitro actions return files the same way, as a base64 string in the File Content token, with the
MIME type in File Content Type and a name in File Name. When you drop File Content into
another action’s file input — a Nitro action, SharePoint Create file, an email attachment — the
designer decodes it for you. You never handle base64 yourself unless you are constructing a file
from scratch (see Building a file from data in the flow).
In the designer every file input has two parts: the content (PDF File, Word File, and so on)
and an optional (file name) field. Nitro only needs the content. The file name is passed through
to the API and is worth setting when the extension matters — for example a data file for
Fill PDF Form, where
.json versus .csv tells Nitro how to parse it.Getting file content in
Chaining Nitro actions
Every action that returns a file exposes three tokens in the dynamic content picker:
To pass a file from one Nitro action to the next, drop File Content into the downstream action’s
file input and File Name into its (file name) field. That is the whole recipe — no
expressions, no Compose steps.
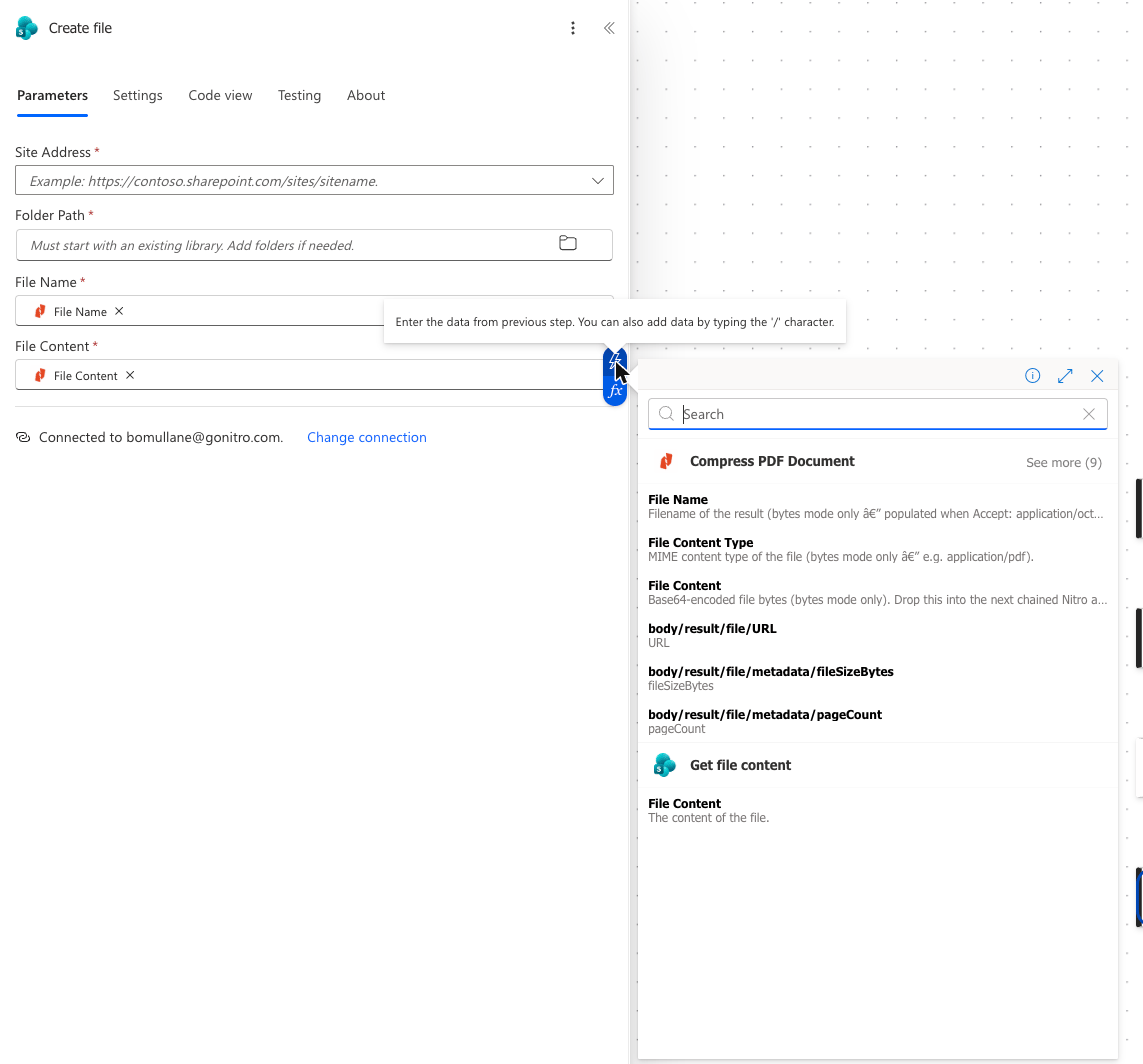
The same three tokens appear for every Nitro action, whichever step you are wiring them into.
- OCR PDF Document — PDF File ← SharePoint File Content.
- Optimize PDF Document — PDF File ← OCR’s File Content, Optimization Profile =
archive. - PDF to PDFA — PDF File ← Optimize’s File Content.
- Create file — File Content ← PDF to PDFA’s File Content.
Getting results out
Drop the last Nitro action’s File Content into whichever step stores or sends the file:Output modes
Actions that return a file have an Accept (Output format) input under Advanced parameters. It selects how the result comes back.- application/octet-stream (default)
- application/json
- Asynchronous
The action waits for Nitro and returns the file itself in File Name, File Content Type
and File Content. This is the mode every example on these pages uses, and the right choice
unless you have a reason to avoid moving bytes through the flow.The body/result/file/…, Job ID, Job Status and Job Progress tokens are still
listed in the picker but resolve to
null in this mode. Ignore them.Multi-file outputs
Split PDF Document and PDF to Image produce more than one file.-
In the default binary mode the result is a ZIP archive — File Content Type is
application/zipand File Name isresult.zip. Power Automate has no built-in unzip action, so write the archive to SharePoint or OneDrive as-is, or use an Azure Function or a third-party connector to expand it. -
In
application/jsonmode the response carries aresult.filesarray, one entry per output file, each with aURL,contentTypeandmetadata. The picker does not list this array, so reference it with an expression and loop over it:Inside Apply to each, fetchitems('Apply_to_each')?['URL']with an HTTP GET and pass the HTTP Body to Create file. Download within the 15-minute window.
File names
Nitro names its output generically —result.pdf, result.docx, result.zip — so the File
Name token is fine for chaining but a poor choice for what you save. Build the saved name from the
trigger instead:
Remember to change the extension when you convert: a PDF to Word output written as
.pdf will
not open in Word. File Content Type tells you what you have if a flow handles several types.
Building a file from data in the flow
Sometimes the file does not exist yet — the content comes from a trigger body, an Excel script, or a Compose step. Power Automate can turn any string into file content with one expression.- JSON data for Fill PDF Form
- HTML for HTML to PDF
- A watermark image from a library
Fill PDF Form takes the field values as a data file (Form Data File) in CSV, JSON, XFDF
or FDF. To build a JSON data file from an array already in the flow — say and its (file name) to A flat object such as
fields in an HTTP
trigger’s body — set the Form Data File content to:formdata.json. The .json extension is how Nitro knows which
parser to use. The array must be a list of field/value objects:{"first_name": "Jane"} is rejected with PDF Form Data Is Invalid.If the values are small, skip the data file entirely and put them in Options (JSON) as
{"fields":[…]} — see JSON inputs. Checkboxes accept true, yes,
1 or x; every value is stringified.base64ToBinary(base64(string(x))) looks redundant, but it is the reliable way to make the designer
treat a string as file bytes rather than as text to be sent as a JSON value.JSON inputs by action
Most actions take their options as a JSON object typed into a single text field. The table gives the exact shape each action expects, checked against the connector definition and the REST API reference. Field names are case-sensitive, and page indices are zero-based everywhere.Paste JSON with straight quotes. A smart quote copied from a document is the most common cause of a
400 Bad request.
Conversions
Transformations
Extractions
Forms
Using JSON outputs
Extraction actions return JSON rather than a file. Everything is under aresult property, and the
picker lists the fields it knows about as body/result/… tokens.
Three ways to consume them, from simplest to most flexible:
- Drop a token. Scalars such as
result.titleorresult.averageConfidencego straight into a condition or a message. - Apply to each over an array. Drop
result.fieldsorresult.PIIBoxesinto the loop and readitems('Apply_to_each')?['value']inside it. - Parse JSON. Feed the Nitro step’s Body to a Parse JSON action with a schema generated from a sample run. Every nested field then becomes a typed token.
Feeding one action’s JSON into another
Some pairs of actions are designed to chain:Smart Detect Form Fields → Create Fillable Forms
Smart Detect Form Fields → Create Fillable Forms
The detection result is exactly the parameter payload the generator wants. Set Form Fields
(JSON) on Create Fillable Forms to:and PDF File to the same PDF you detected on. To review or edit fields in between, run the
result through Parse JSON, a Filter array on
confidence, and a Compose that
rebuilds {"formFields": …}.Extract PII from PDF → Redact PDF Pages
Extract PII from PDF → Redact PDF Pages
Both use Add a Filter array before the Select to redact only certain
[x, y, width, height] boxes, but the shapes differ: PII returns PIIBoxes, Redact
wants redactions. Map one to the other with a Select action:- From:
body('Extract_PII_from_PDF')?['result']?['PIIBoxes'] - Map:
pageIndex→item()?['pageIndex'],boundingBox→item()?['boundingBox']
PIIType values or a
minimum confidence.Extract searched Text from PDF → Redact PDF Pages
Extract searched Text from PDF → Redact PDF Pages
Matches are nested two levels down (
textBoxes[].matches[].boxes[]). Flatten them with nested
Apply to each loops appending to an array variable, or, simpler, use Extract PII when the
target is a standard PII category.Extract Properties from PDF → a condition
Extract Properties from PDF → a condition
Properties gives you the document’s title, author, dates and
producer, which are handy for
conditions such as “skip files our own system already produced” (result.producer). It does
not include a page count; to branch on that, run any transformation in application/json mode
and read body/result/file/metadata/pageCount.Merging a variable number of files
Merge PDF Documents exposes eight discrete inputs (File 1 … File 8) rather than a list, so the number of files has to be known at design time.Fixed, small counts
Fixed, small counts
Fill only the slots you need. File 1 and File 2 are required; File 3 to File 8
are under Advanced parameters and can be left empty.
Unknown counts up to eight
Unknown counts up to eight
Collect the files into an array variable, then bind each input with an index expression such as
variables('files')?[2], guarding the optional slots with a condition on
length(variables('files')).More than eight files
More than eight files
Merge in batches: merge the first eight, then merge that result with the next seven, and so on.
Each call counts against the throttling limit, so keep batches as large as possible. The
bookmarks from an intermediate merge are replaced by the next merge’s Document n bookmarks,
so only the final call’s bookmarks survive.