> ## Documentation Index
> Fetch the complete documentation index at: https://developers.gonitro.com/docs/llms.txt
> Use this file to discover all available pages before exploring further.
# Get started with Power Automate
> Create a Nitro PDF Services connection in Power Automate and build your first flow — no connector import required.
The Nitro PDF Services connector is published in the Power Automate connector gallery, so there is
nothing to install. This guide takes you from a blank environment to a working flow that compresses
every PDF added to a SharePoint library.
## Before you start
A **Client ID** and **Client Secret** for an API application. See
[Credentials](/docs/authentication/credentials) for how to create one in the Nitro Developer portal, or
[request API access](https://sso.gonitro.com/platform-trial-signup) if you do not
have an account yet.
Nitro PDF Services is a **premium** connector. You need a Power Automate, Power Apps, Logic Apps,
or Copilot Studio plan that includes premium connectors.
## 1. Create a connection
You can create the connection ahead of time, or let the designer prompt you the first time you add a
Nitro action. Either way the dialog is the same.
In [Power Automate](https://make.powerautomate.com/), go to **Connections** in the left
navigation and click **New connection**.
Search for **Nitro** and click **+** on **Nitro PDF Services** (publisher *Nitro PDF*).
Fill in **Nitro Client ID** and **Nitro Client Secret**, optionally give the connection a
display name, and click **Create**.
 There is no interactive sign-in. The connector exchanges your credentials for an access token behind
the scenes and refreshes it automatically — see
[Authentication](/docs/integrations/power-automate/authentication).
Nitro connections are **not shareable**. If you share a flow or app, the other person is prompted to
create their own connection with their own credentials.
## 2. Build your first flow
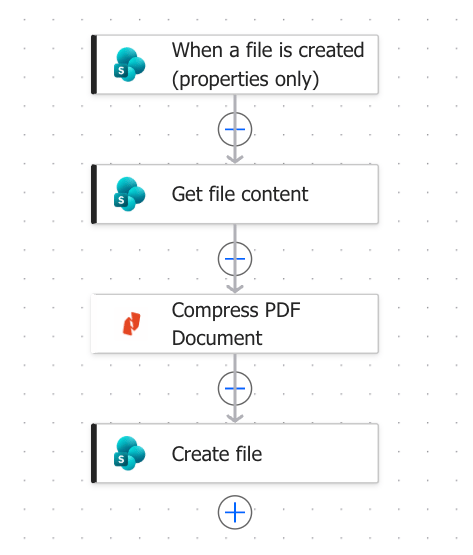
The flow below watches a SharePoint document library, compresses each new PDF with Nitro, and writes
the result to another folder. It uses four steps and no expressions.
There is no interactive sign-in. The connector exchanges your credentials for an access token behind
the scenes and refreshes it automatically — see
[Authentication](/docs/integrations/power-automate/authentication).
Nitro connections are **not shareable**. If you share a flow or app, the other person is prompted to
create their own connection with their own credentials.
## 2. Build your first flow
The flow below watches a SharePoint document library, compresses each new PDF with Nitro, and writes
the result to another folder. It uses four steps and no expressions.
 On the **Create** page choose **Automated cloud flow**, name it, and pick the SharePoint trigger
**When a file is created (properties only)**. Set **Site Address** and **Library Name** to the
library you want to watch.
Click **+** under the trigger, search for **Get file content** and pick the SharePoint action.
Set **Site Address** to the same site and **File Identifier** to the trigger's **Identifier**
output.
The *properties only* trigger does not include the file's bytes. This step is what actually
loads the PDF; without it the Nitro action has nothing to work on.
Click **+** again, search for **Nitro PDF Services** and click **See more** to list every
action. Pick **Compress PDF Document**.
On the **Create** page choose **Automated cloud flow**, name it, and pick the SharePoint trigger
**When a file is created (properties only)**. Set **Site Address** and **Library Name** to the
library you want to watch.
Click **+** under the trigger, search for **Get file content** and pick the SharePoint action.
Set **Site Address** to the same site and **File Identifier** to the trigger's **Identifier**
output.
The *properties only* trigger does not include the file's bytes. This step is what actually
loads the PDF; without it the Nitro action has nothing to work on.
Click **+** again, search for **Nitro PDF Services** and click **See more** to list every
action. Pick **Compress PDF Document**.
 If you have not created a connection yet, the designer asks you to do so now.
Click into the **PDF File** input, then click the lightning-bolt icon to open the dynamic
content picker. Under **Get file content**, choose **File Content**.
If you have not created a connection yet, the designer asks you to do so now.
Click into the **PDF File** input, then click the lightning-bolt icon to open the dynamic
content picker. Under **Get file content**, choose **File Content**.
 Leave **PDF File (file name)** empty for now, and leave **Accept (Output format)** under
**Advanced parameters** at its default, `application/octet-stream`, so the action returns the
compressed PDF itself.
Click **+**, search for **Create file** and pick the SharePoint action. Set **Site Address** and
**Folder Path** to where the compressed copy should go — use a *different* folder or library
from the one the trigger watches, otherwise the flow triggers itself.
Then open the dynamic content picker for **File Content**. The **Compress PDF Document** step
exposes three file tokens: **File Name**, **File Content Type**, and **File Content**.
Leave **PDF File (file name)** empty for now, and leave **Accept (Output format)** under
**Advanced parameters** at its default, `application/octet-stream`, so the action returns the
compressed PDF itself.
Click **+**, search for **Create file** and pick the SharePoint action. Set **Site Address** and
**Folder Path** to where the compressed copy should go — use a *different* folder or library
from the one the trigger watches, otherwise the flow triggers itself.
Then open the dynamic content picker for **File Content**. The **Compress PDF Document** step
exposes three file tokens: **File Name**, **File Content Type**, and **File Content**.
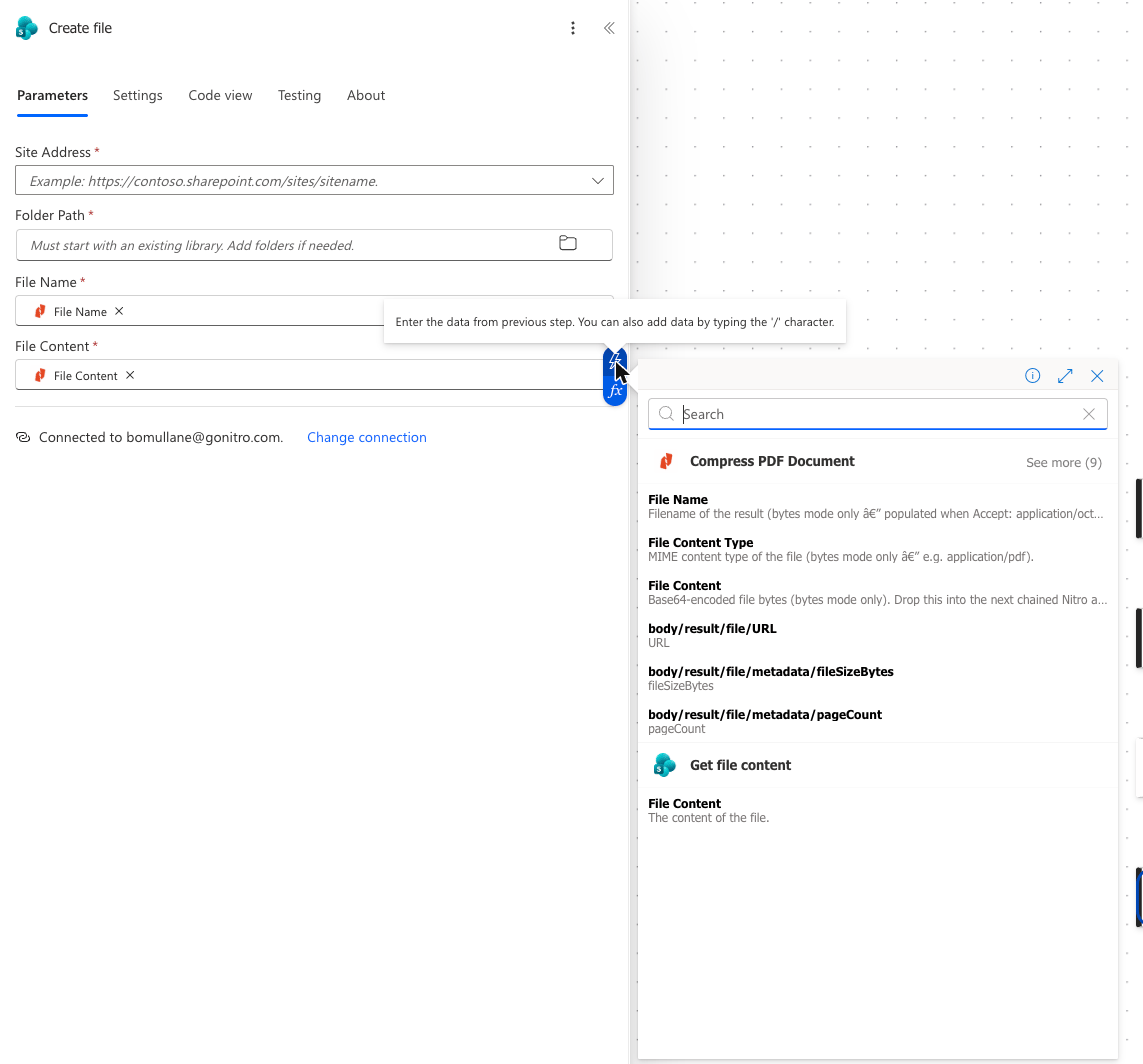 Drop **File Content** into **File Content**, and **File Name** into **File Name**.
 Click **Save**, then **Test → Manually** and drop a PDF into the watched library. The run
history shows each step's inputs and outputs, including the size of the file Nitro returned.
Nitro's **File Name** output is a generic name such as `result.pdf`, so every run of the flow above
writes the same file name. To keep the original name, set **File Name** on **Create file** to the
trigger's **File name with extension** token instead — see
[File names](/docs/integrations/power-automate/working-with-files#file-names).
## What just happened
* SharePoint handed the PDF's bytes to the Nitro action as **File Content**.
* The connector uploaded the bytes to Nitro, waited for the result, and returned the compressed PDF
as a **File Content** token that any later step can use.
* Nothing about tokens, base64, or the REST API surfaced in the designer. When you do want to know
how files move between steps, read
[Working with files](/docs/integrations/power-automate/working-with-files).
## Next steps
Chaining Nitro actions, output modes, and the JSON each action expects.
Every action, with its inputs and outputs.
File size, page count, throttling, and error codes.
Click **Save**, then **Test → Manually** and drop a PDF into the watched library. The run
history shows each step's inputs and outputs, including the size of the file Nitro returned.
Nitro's **File Name** output is a generic name such as `result.pdf`, so every run of the flow above
writes the same file name. To keep the original name, set **File Name** on **Create file** to the
trigger's **File name with extension** token instead — see
[File names](/docs/integrations/power-automate/working-with-files#file-names).
## What just happened
* SharePoint handed the PDF's bytes to the Nitro action as **File Content**.
* The connector uploaded the bytes to Nitro, waited for the result, and returned the compressed PDF
as a **File Content** token that any later step can use.
* Nothing about tokens, base64, or the REST API surfaced in the designer. When you do want to know
how files move between steps, read
[Working with files](/docs/integrations/power-automate/working-with-files).
## Next steps
Chaining Nitro actions, output modes, and the JSON each action expects.
Every action, with its inputs and outputs.
File size, page count, throttling, and error codes.