> ## Documentation Index
> Fetch the complete documentation index at: https://developers.gonitro.com/docs/llms.txt
> Use this file to discover all available pages before exploring further.
# Bounding Box Guide
> Define field position and size in a PDF using bounding box coordinates with the Nitro Sign API. Specify location, width, and height in PDF points.
#### What is a Bounding Box?
In Nitro, a bounding box is the container of a signature field. The bounding box of a field is defined by the top-left coordinate of the rectangle and the size of the rectangle. Keep in mind that:
* Coordinates are expressed in points (pt).
* Size is expressed in points (pt).
* The origin of the document, or position (0,0), is located at the top-left corner.
A point is a unit of measurement equal to 1/72 of an inch (approximately 0.3527 mm). Points are the standard unit for positioning and sizing elements in digital documents and are widely supported by image editing and document layout software.
## The Bounding Box Array
In Nitro, the bounding box of a field is defined as an array with the format:
`[x, y, w, h]`
These values represent the starting coordinates of the bounding box and the size of the rectangle, as shown in the diagram below:
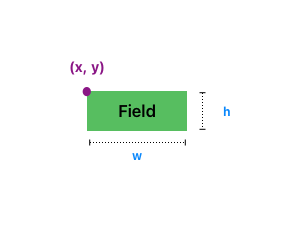 Where:
* `x`: The horizontal position of the first corner, measured from the left edge of the document.
* `y`: The vertical position of the first corner, measured from the top edge of the document.
* `w`: The width of the bounding box.
* `h`: The height of the bounding box.
## Bounding Box Example
To visualize a bounding box, let’s assume we are placing a field on a standard US Letter–sized document with dimensions `612 pt (width) × 792 pt (height)`.
In this document, the field is positioned using the following bounding box array:
```json theme={null}
{
"boundingBox": [200, 300, 60, 40]
}
```
This bounding box translates to:
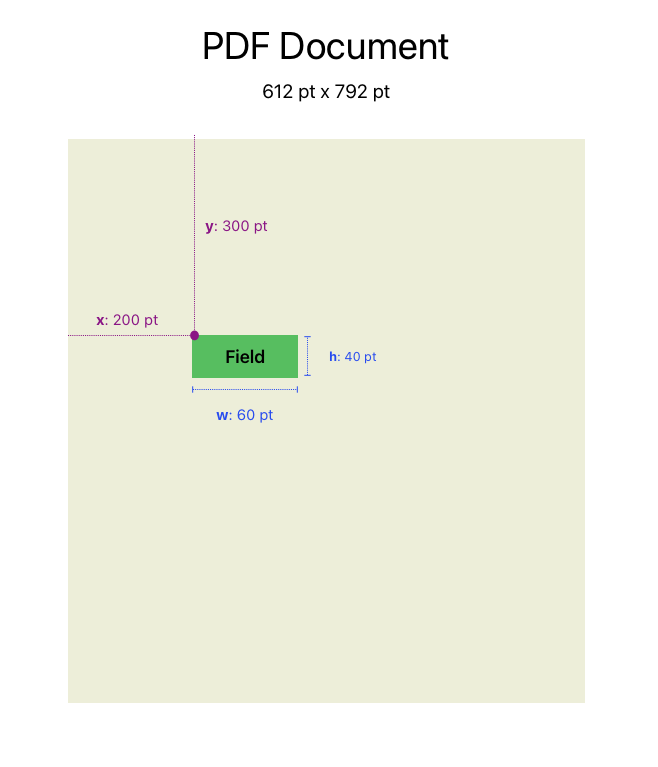
* The first corner of the field is located at 200 points from the left edge (x) and 300 points from the top edge (y) of the document.
* The field's box has a width of 60 pt and a height of 40 pt.
If we sketch this bounding box on our 612 pt × 792 pt document, the field would appear as shown in the diagram below:
Where:
* `x`: The horizontal position of the first corner, measured from the left edge of the document.
* `y`: The vertical position of the first corner, measured from the top edge of the document.
* `w`: The width of the bounding box.
* `h`: The height of the bounding box.
## Bounding Box Example
To visualize a bounding box, let’s assume we are placing a field on a standard US Letter–sized document with dimensions `612 pt (width) × 792 pt (height)`.
In this document, the field is positioned using the following bounding box array:
```json theme={null}
{
"boundingBox": [200, 300, 60, 40]
}
```
This bounding box translates to:
* The first corner of the field is located at 200 points from the left edge (x) and 300 points from the top edge (y) of the document.
* The field's box has a width of 60 pt and a height of 40 pt.
If we sketch this bounding box on our 612 pt × 792 pt document, the field would appear as shown in the diagram below:
 ## How can I find coordinates in my document?
The easiest way to determine the coordinates of a field is by using image or PDF visualization software.
Most PDF viewing and editing tools support points (pt) and allow you to inspect point-based coordinates within a document.
Below are a few software-specific instructions for locating the position of fields in your document.
Keep in mind that this is not a comprehensive list.
Nitro PDF is available for Windows. You can download it in the user portal.
Open a PDF document with Nitro PDF.
## How can I find coordinates in my document?
The easiest way to determine the coordinates of a field is by using image or PDF visualization software.
Most PDF viewing and editing tools support points (pt) and allow you to inspect point-based coordinates within a document.
Below are a few software-specific instructions for locating the position of fields in your document.
Keep in mind that this is not a comprehensive list.
Nitro PDF is available for Windows. You can download it in the user portal.
Open a PDF document with Nitro PDF.
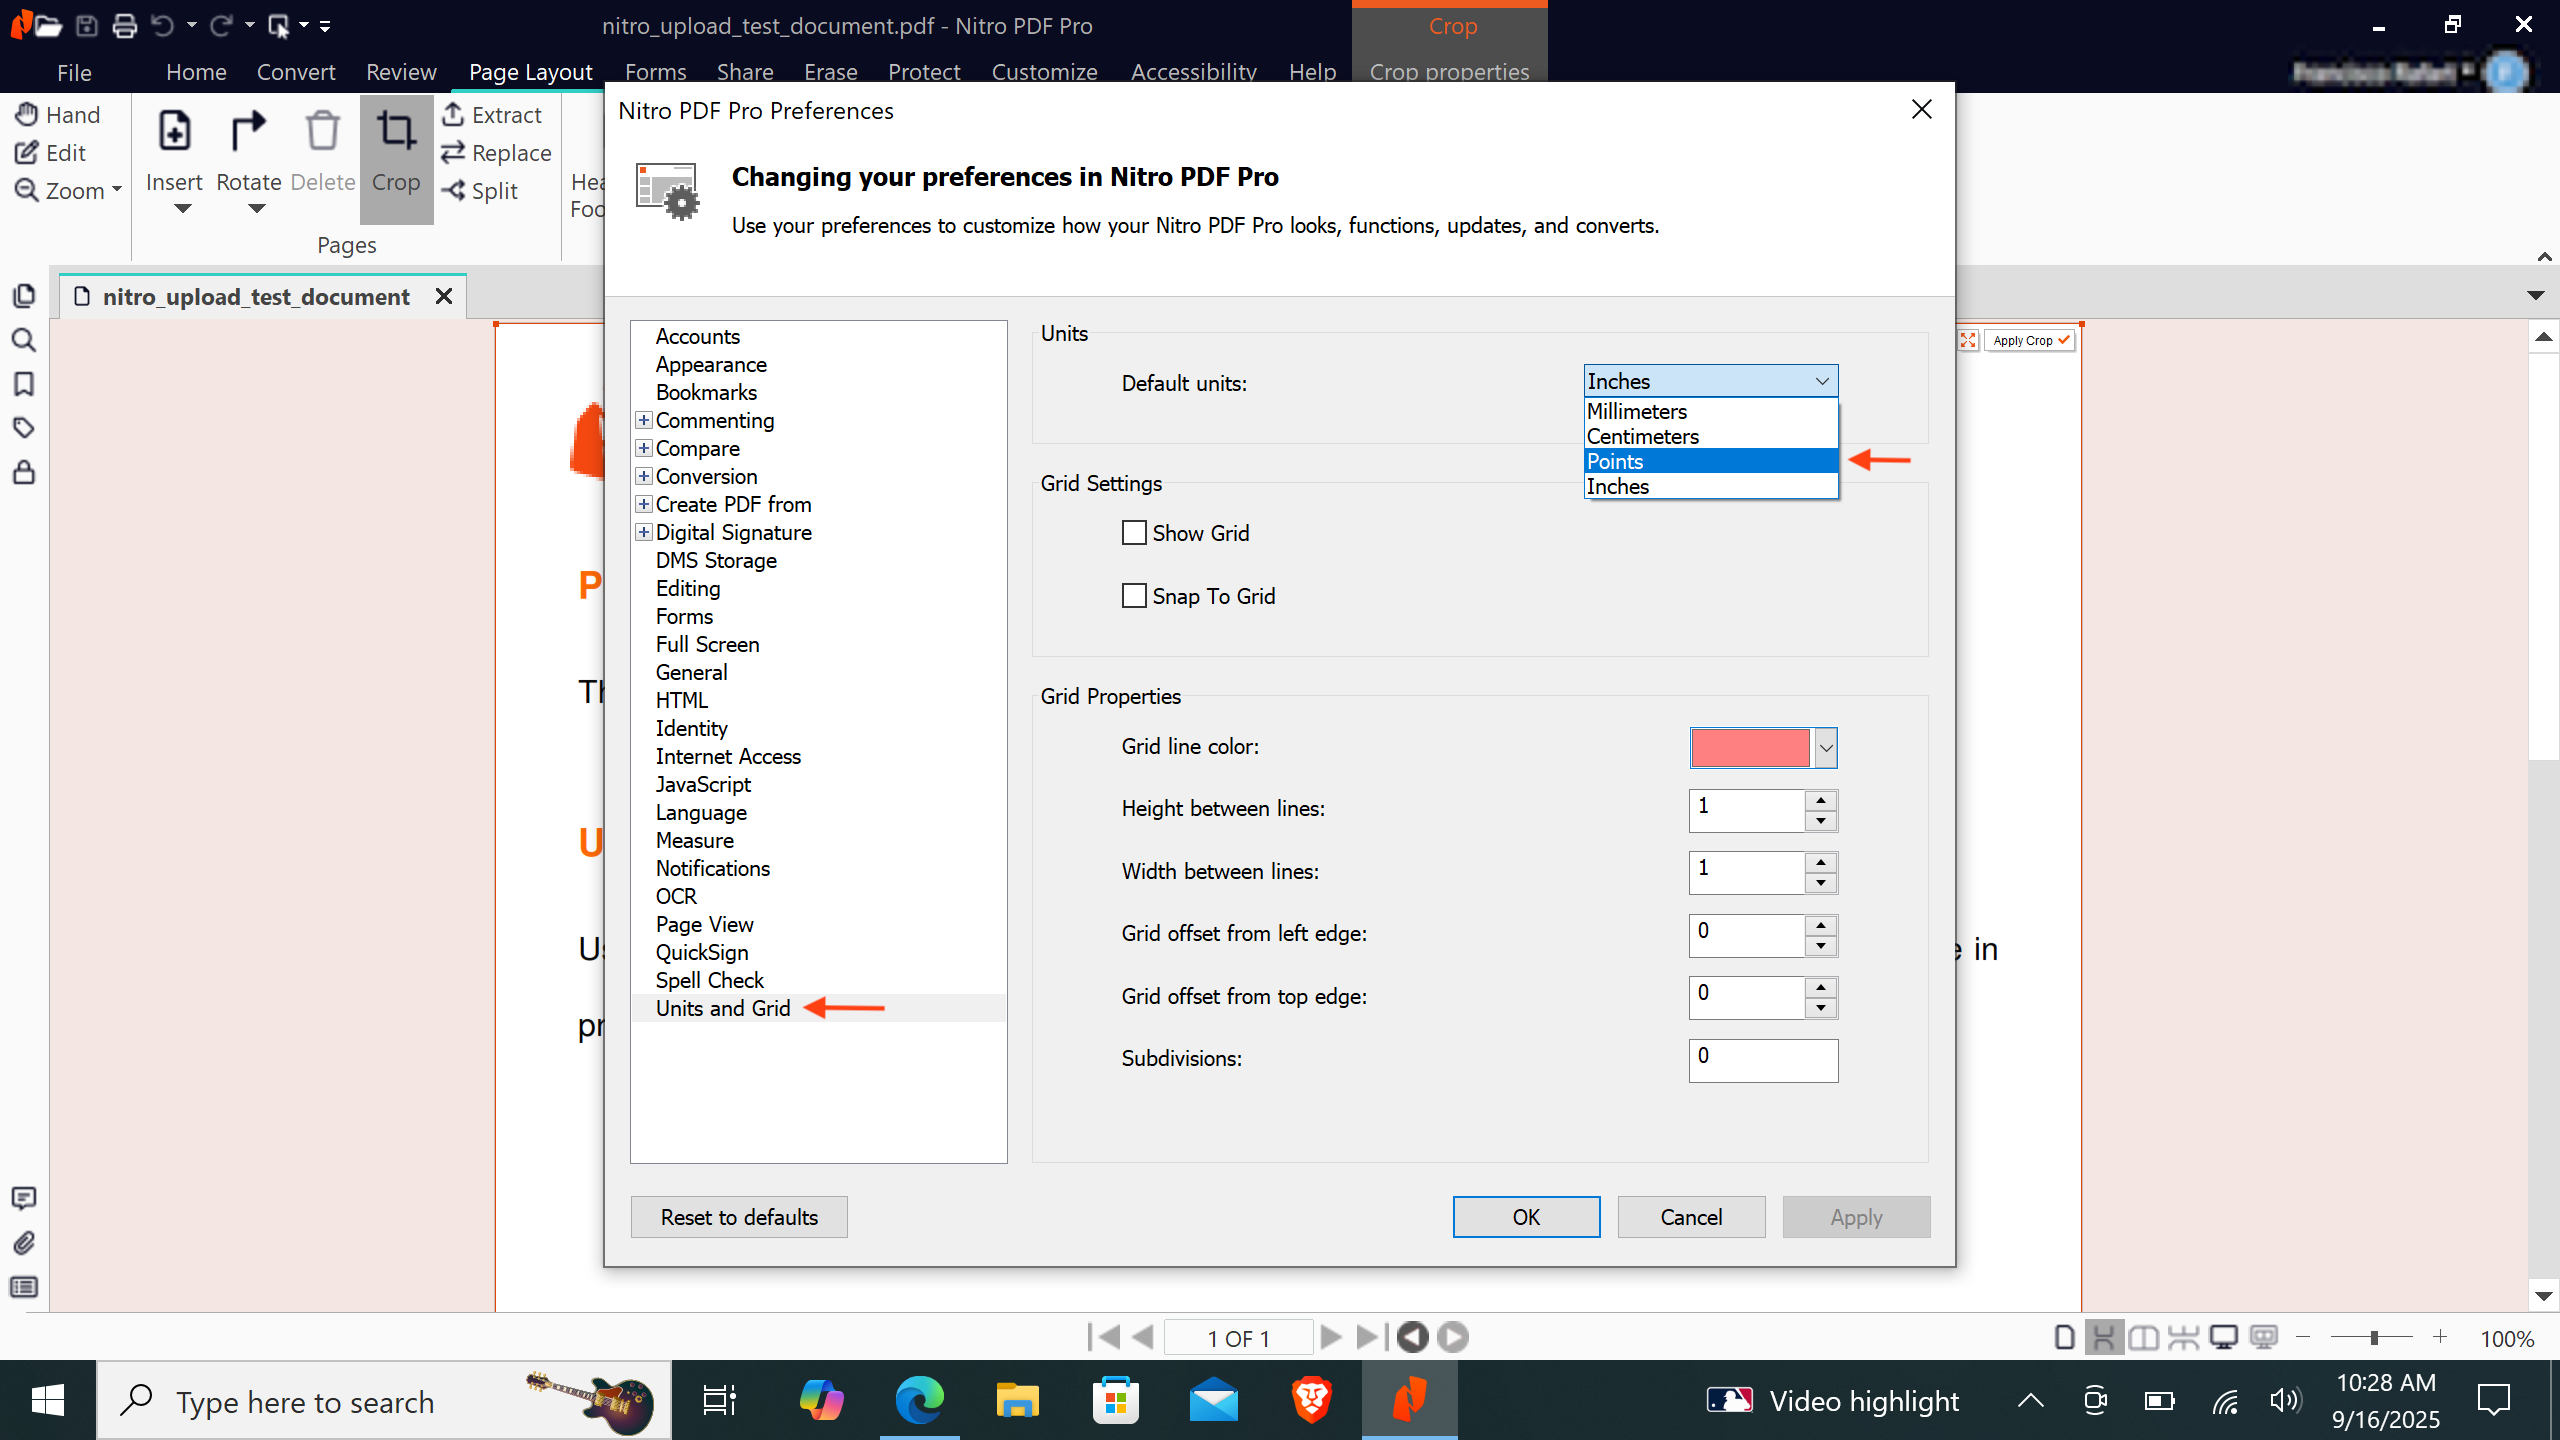
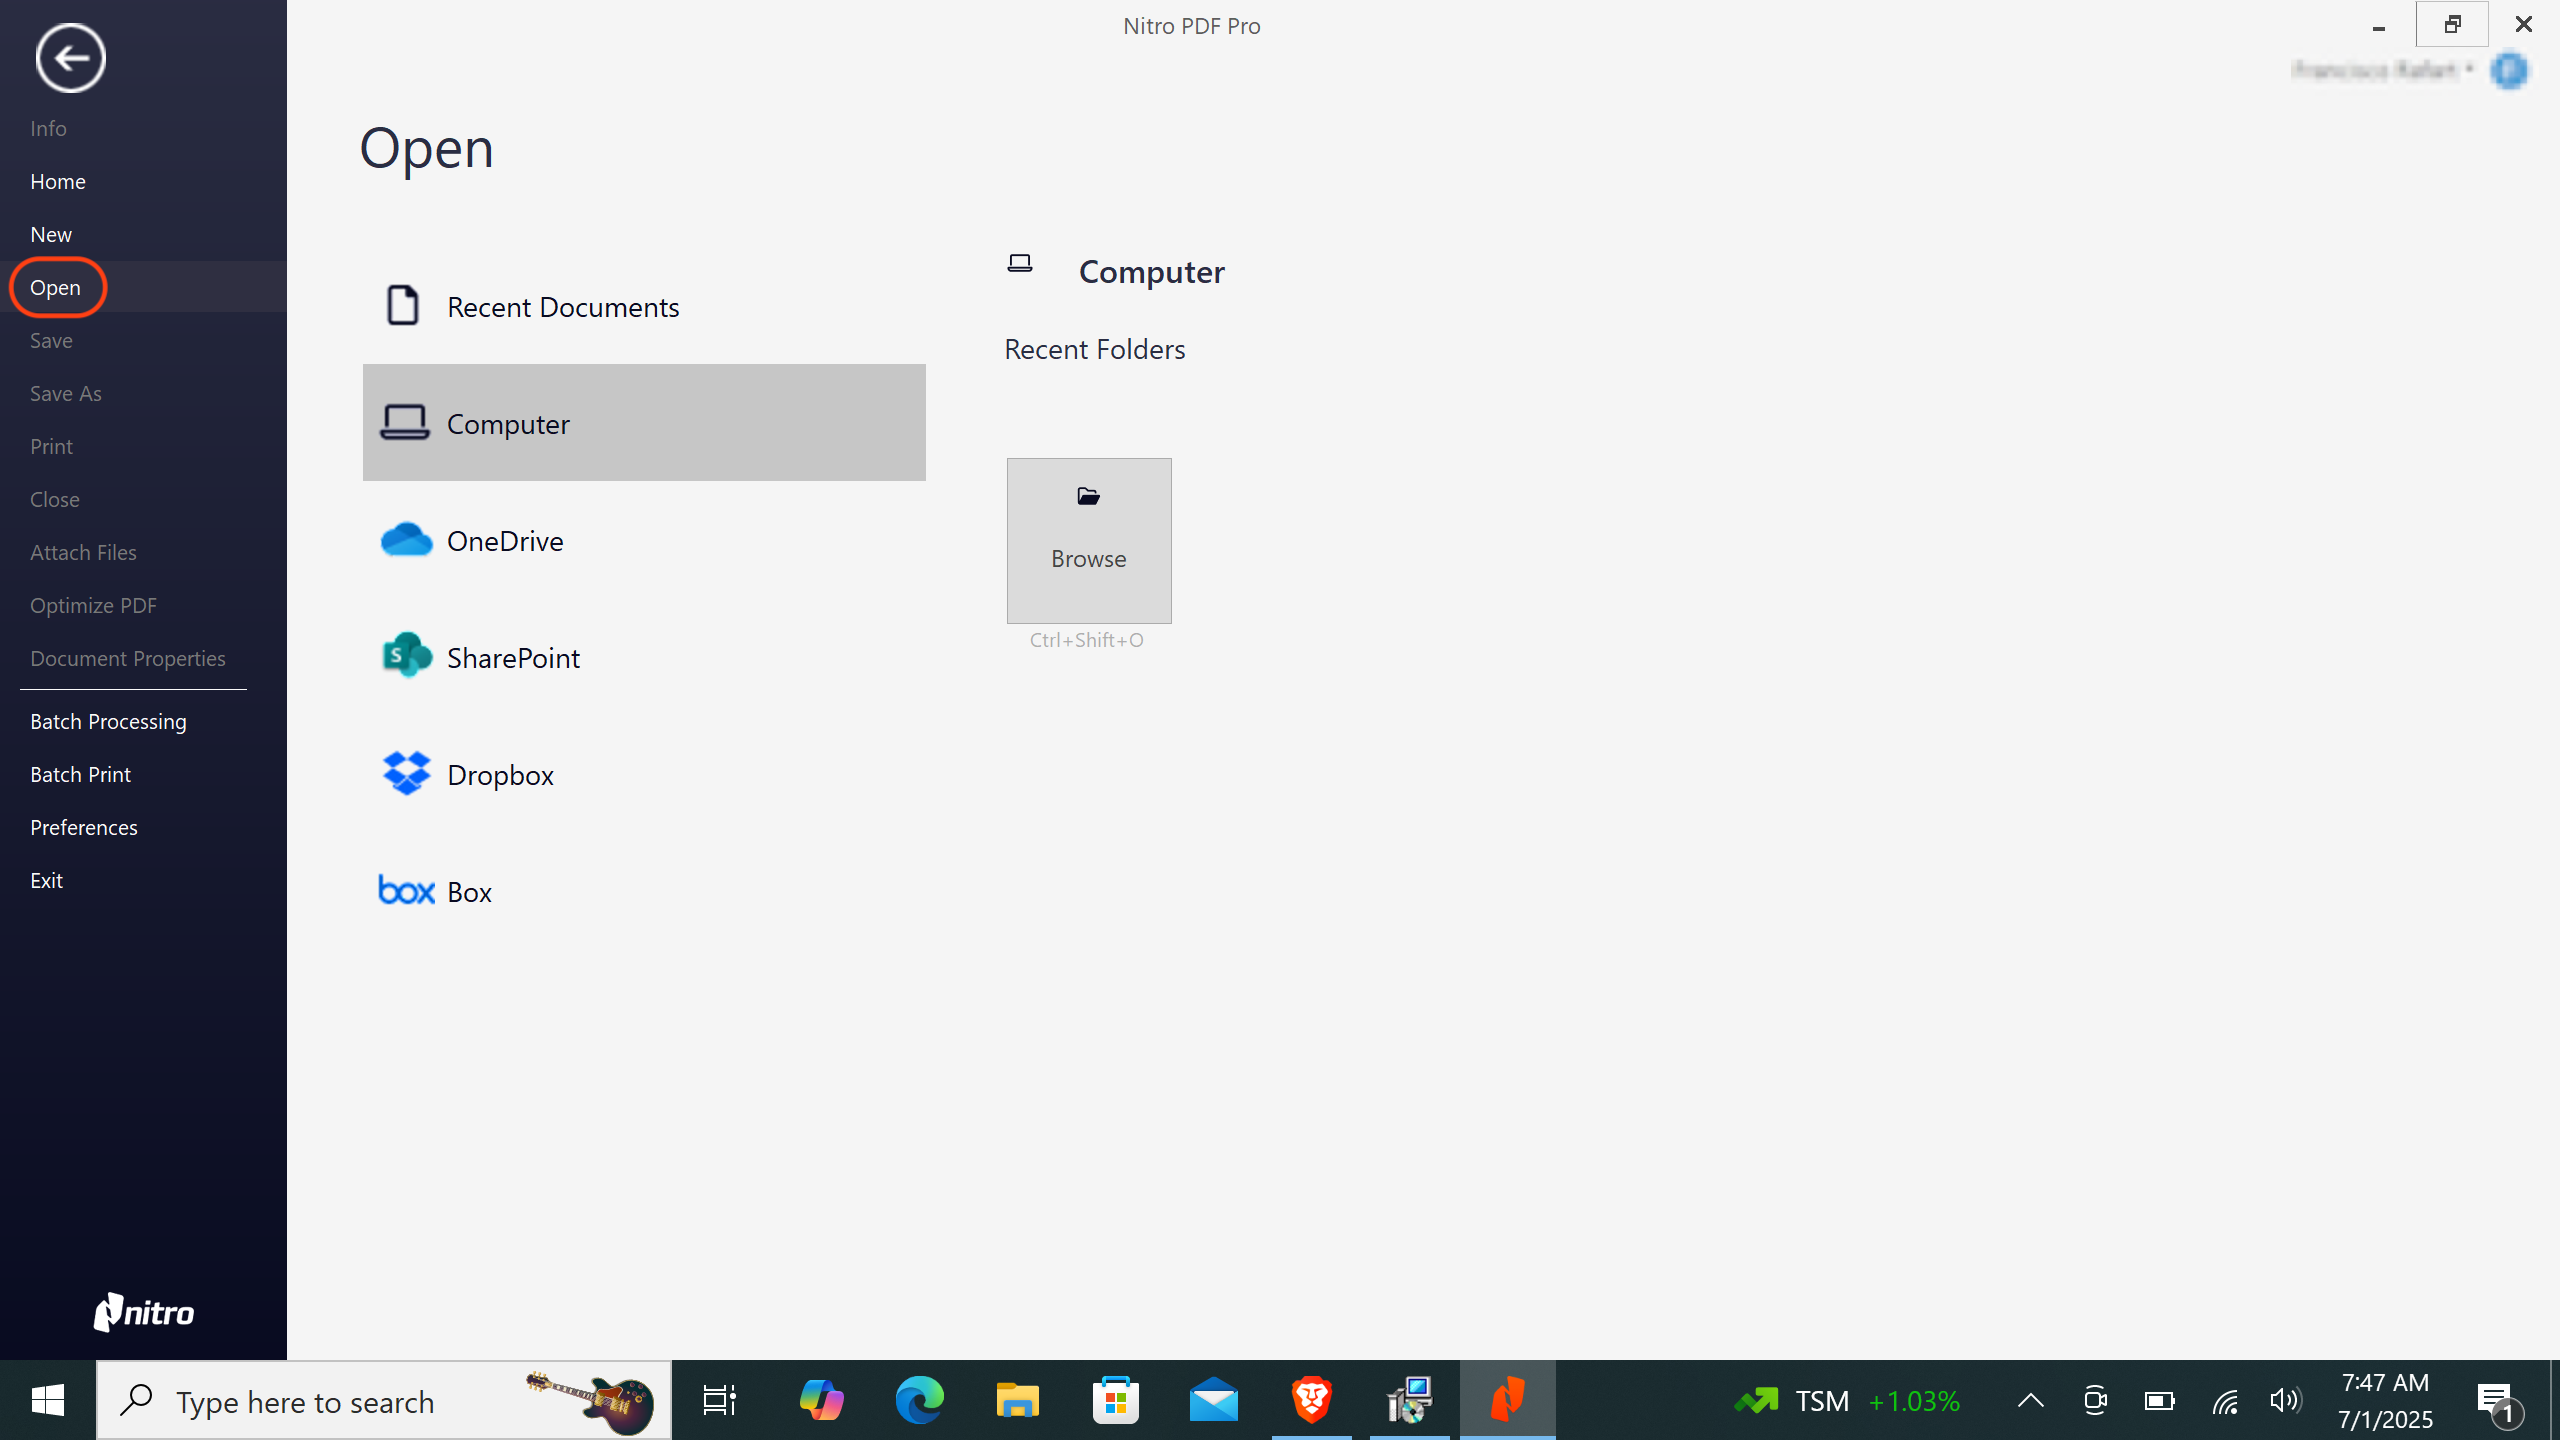 Make sure the measuring unit in Nitro PDF is set to Points. To do this:
* Go to `File` tab in the navigation menu and select `Preferences` in the left panel. A preferences window will open.
Make sure the measuring unit in Nitro PDF is set to Points. To do this:
* Go to `File` tab in the navigation menu and select `Preferences` in the left panel. A preferences window will open.
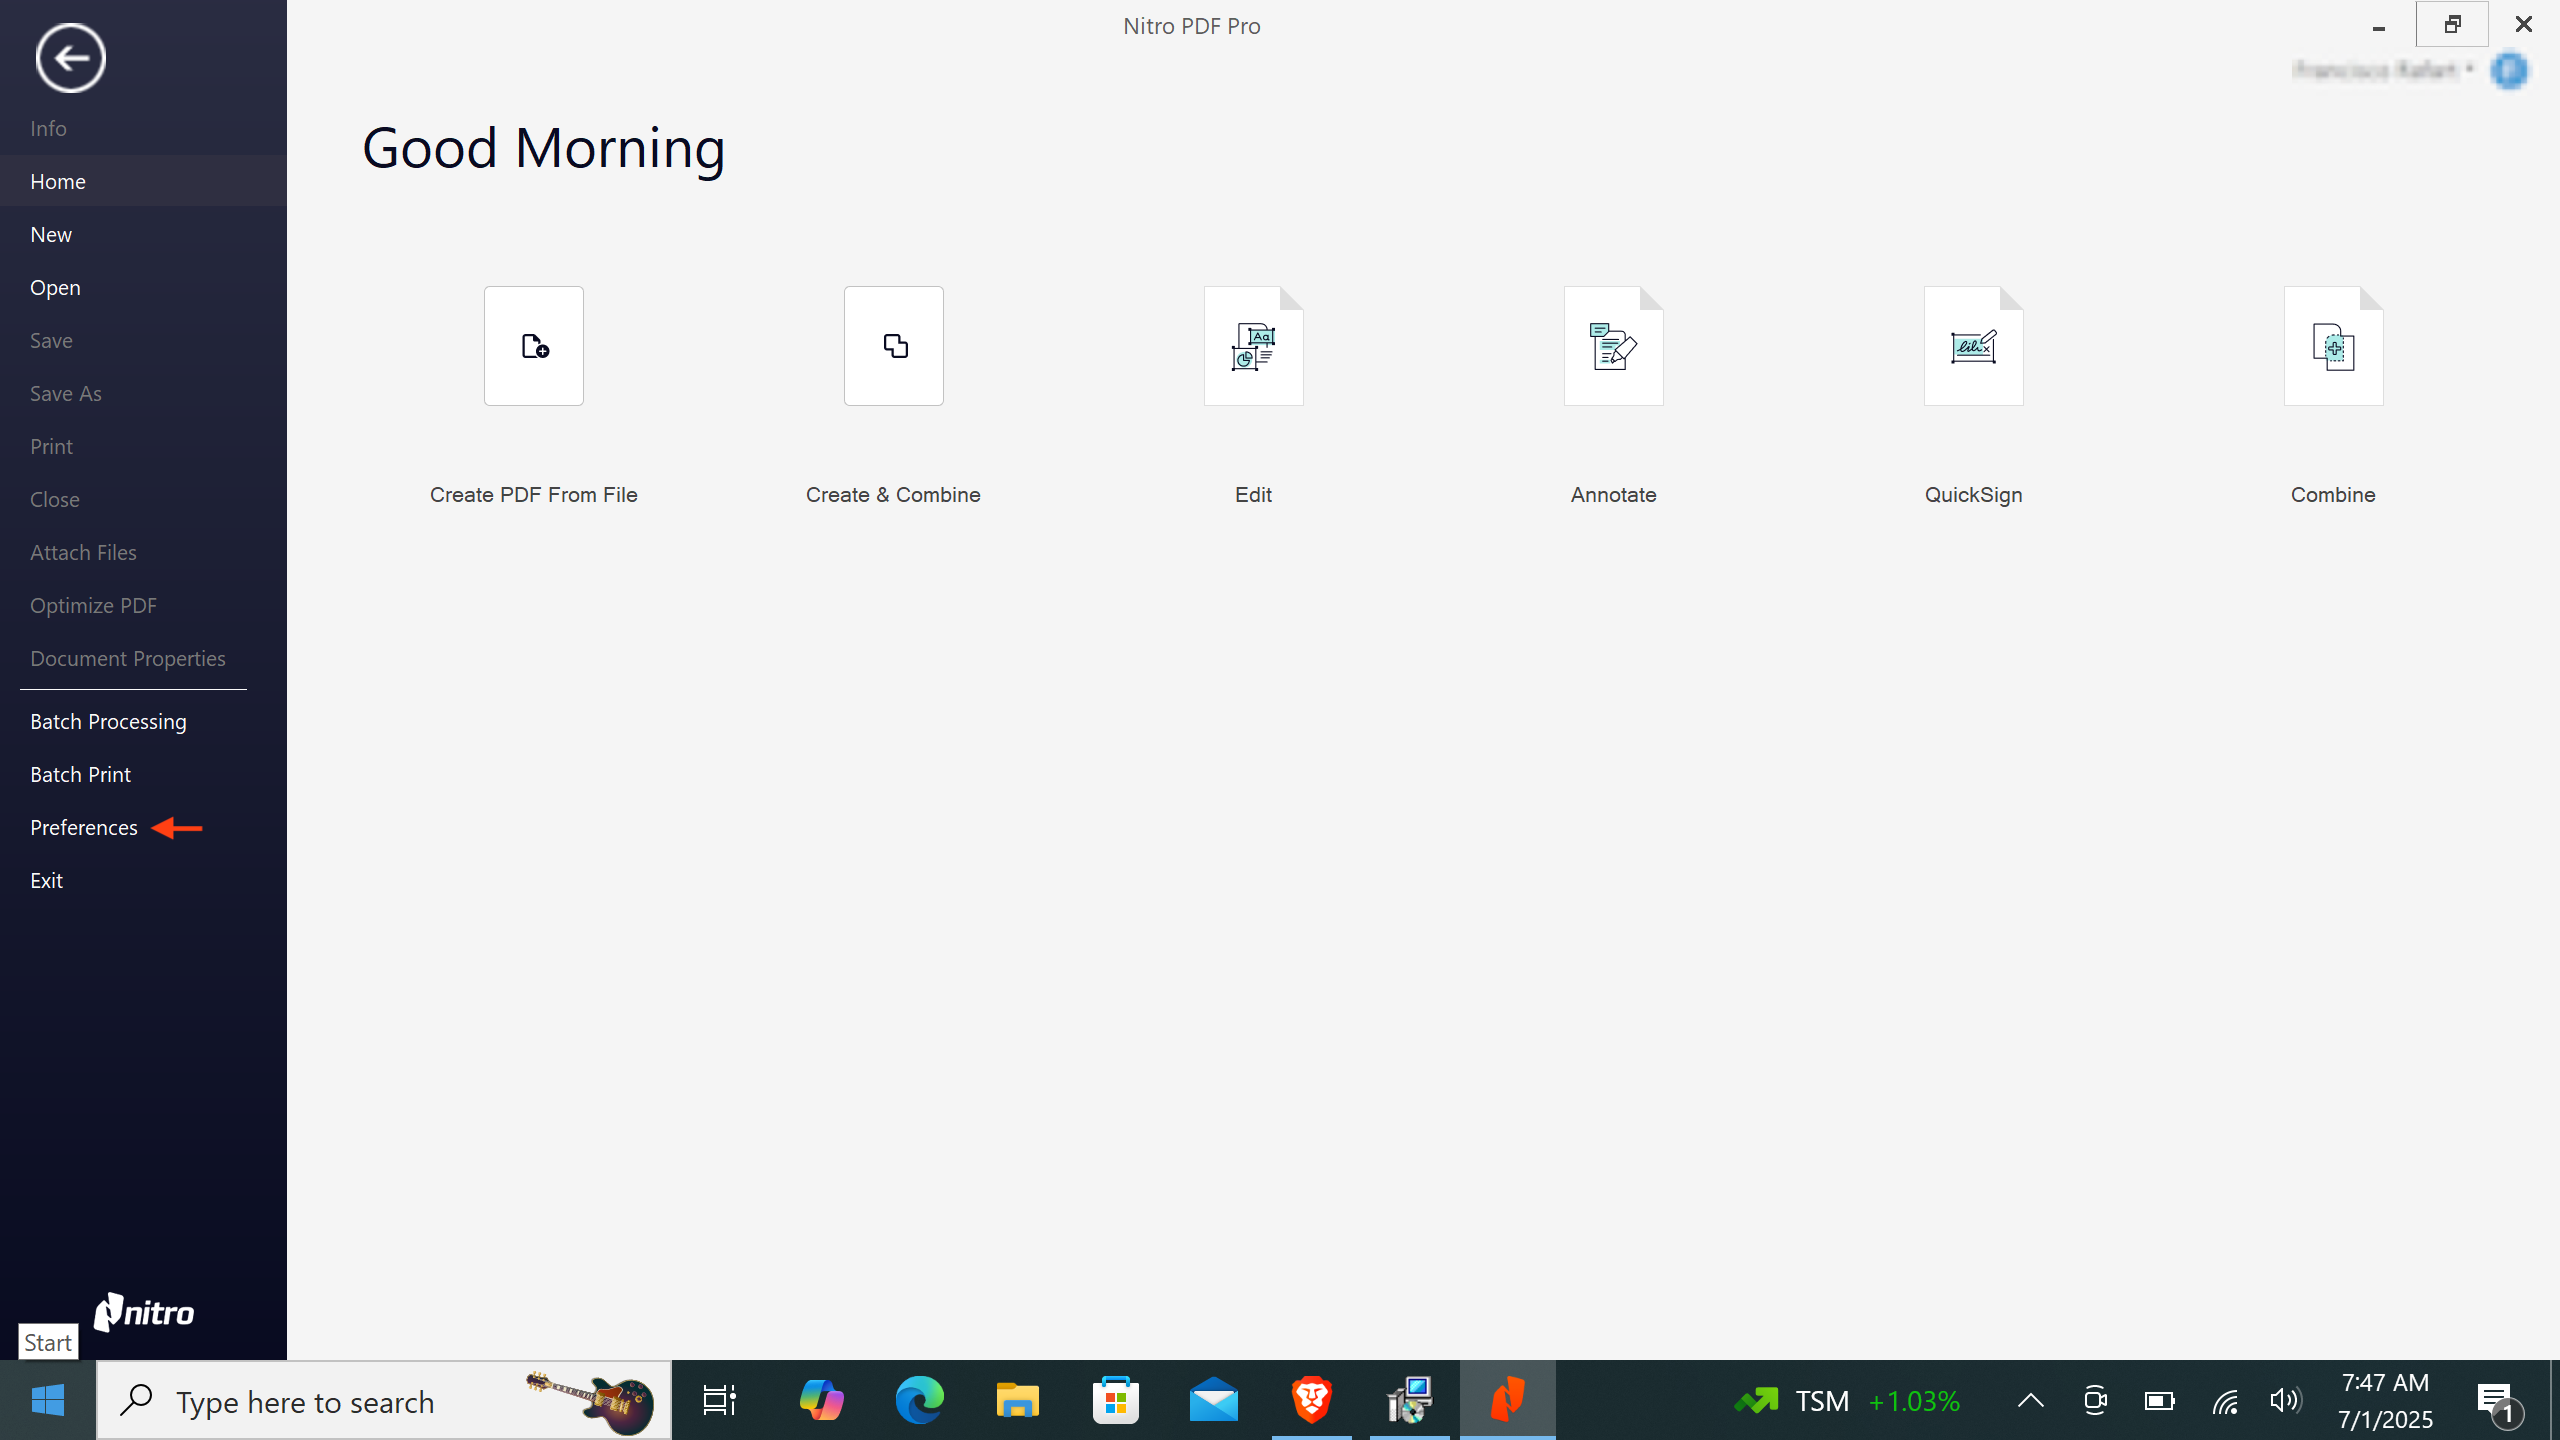 * In the `Preferences` window, select `Units and Grid` from the left panel.
* In the `Units` section, set `Default Units` to `Points` from the dropdown menu.
* Click `Apply` to save your changes.
* In the `Preferences` window, select `Units and Grid` from the left panel.
* In the `Units` section, set `Default Units` to `Points` from the dropdown menu.
* Click `Apply` to save your changes.
 To measure the bounding box dimensions, use the Crop tool. If it is available in your tools menu, select it.
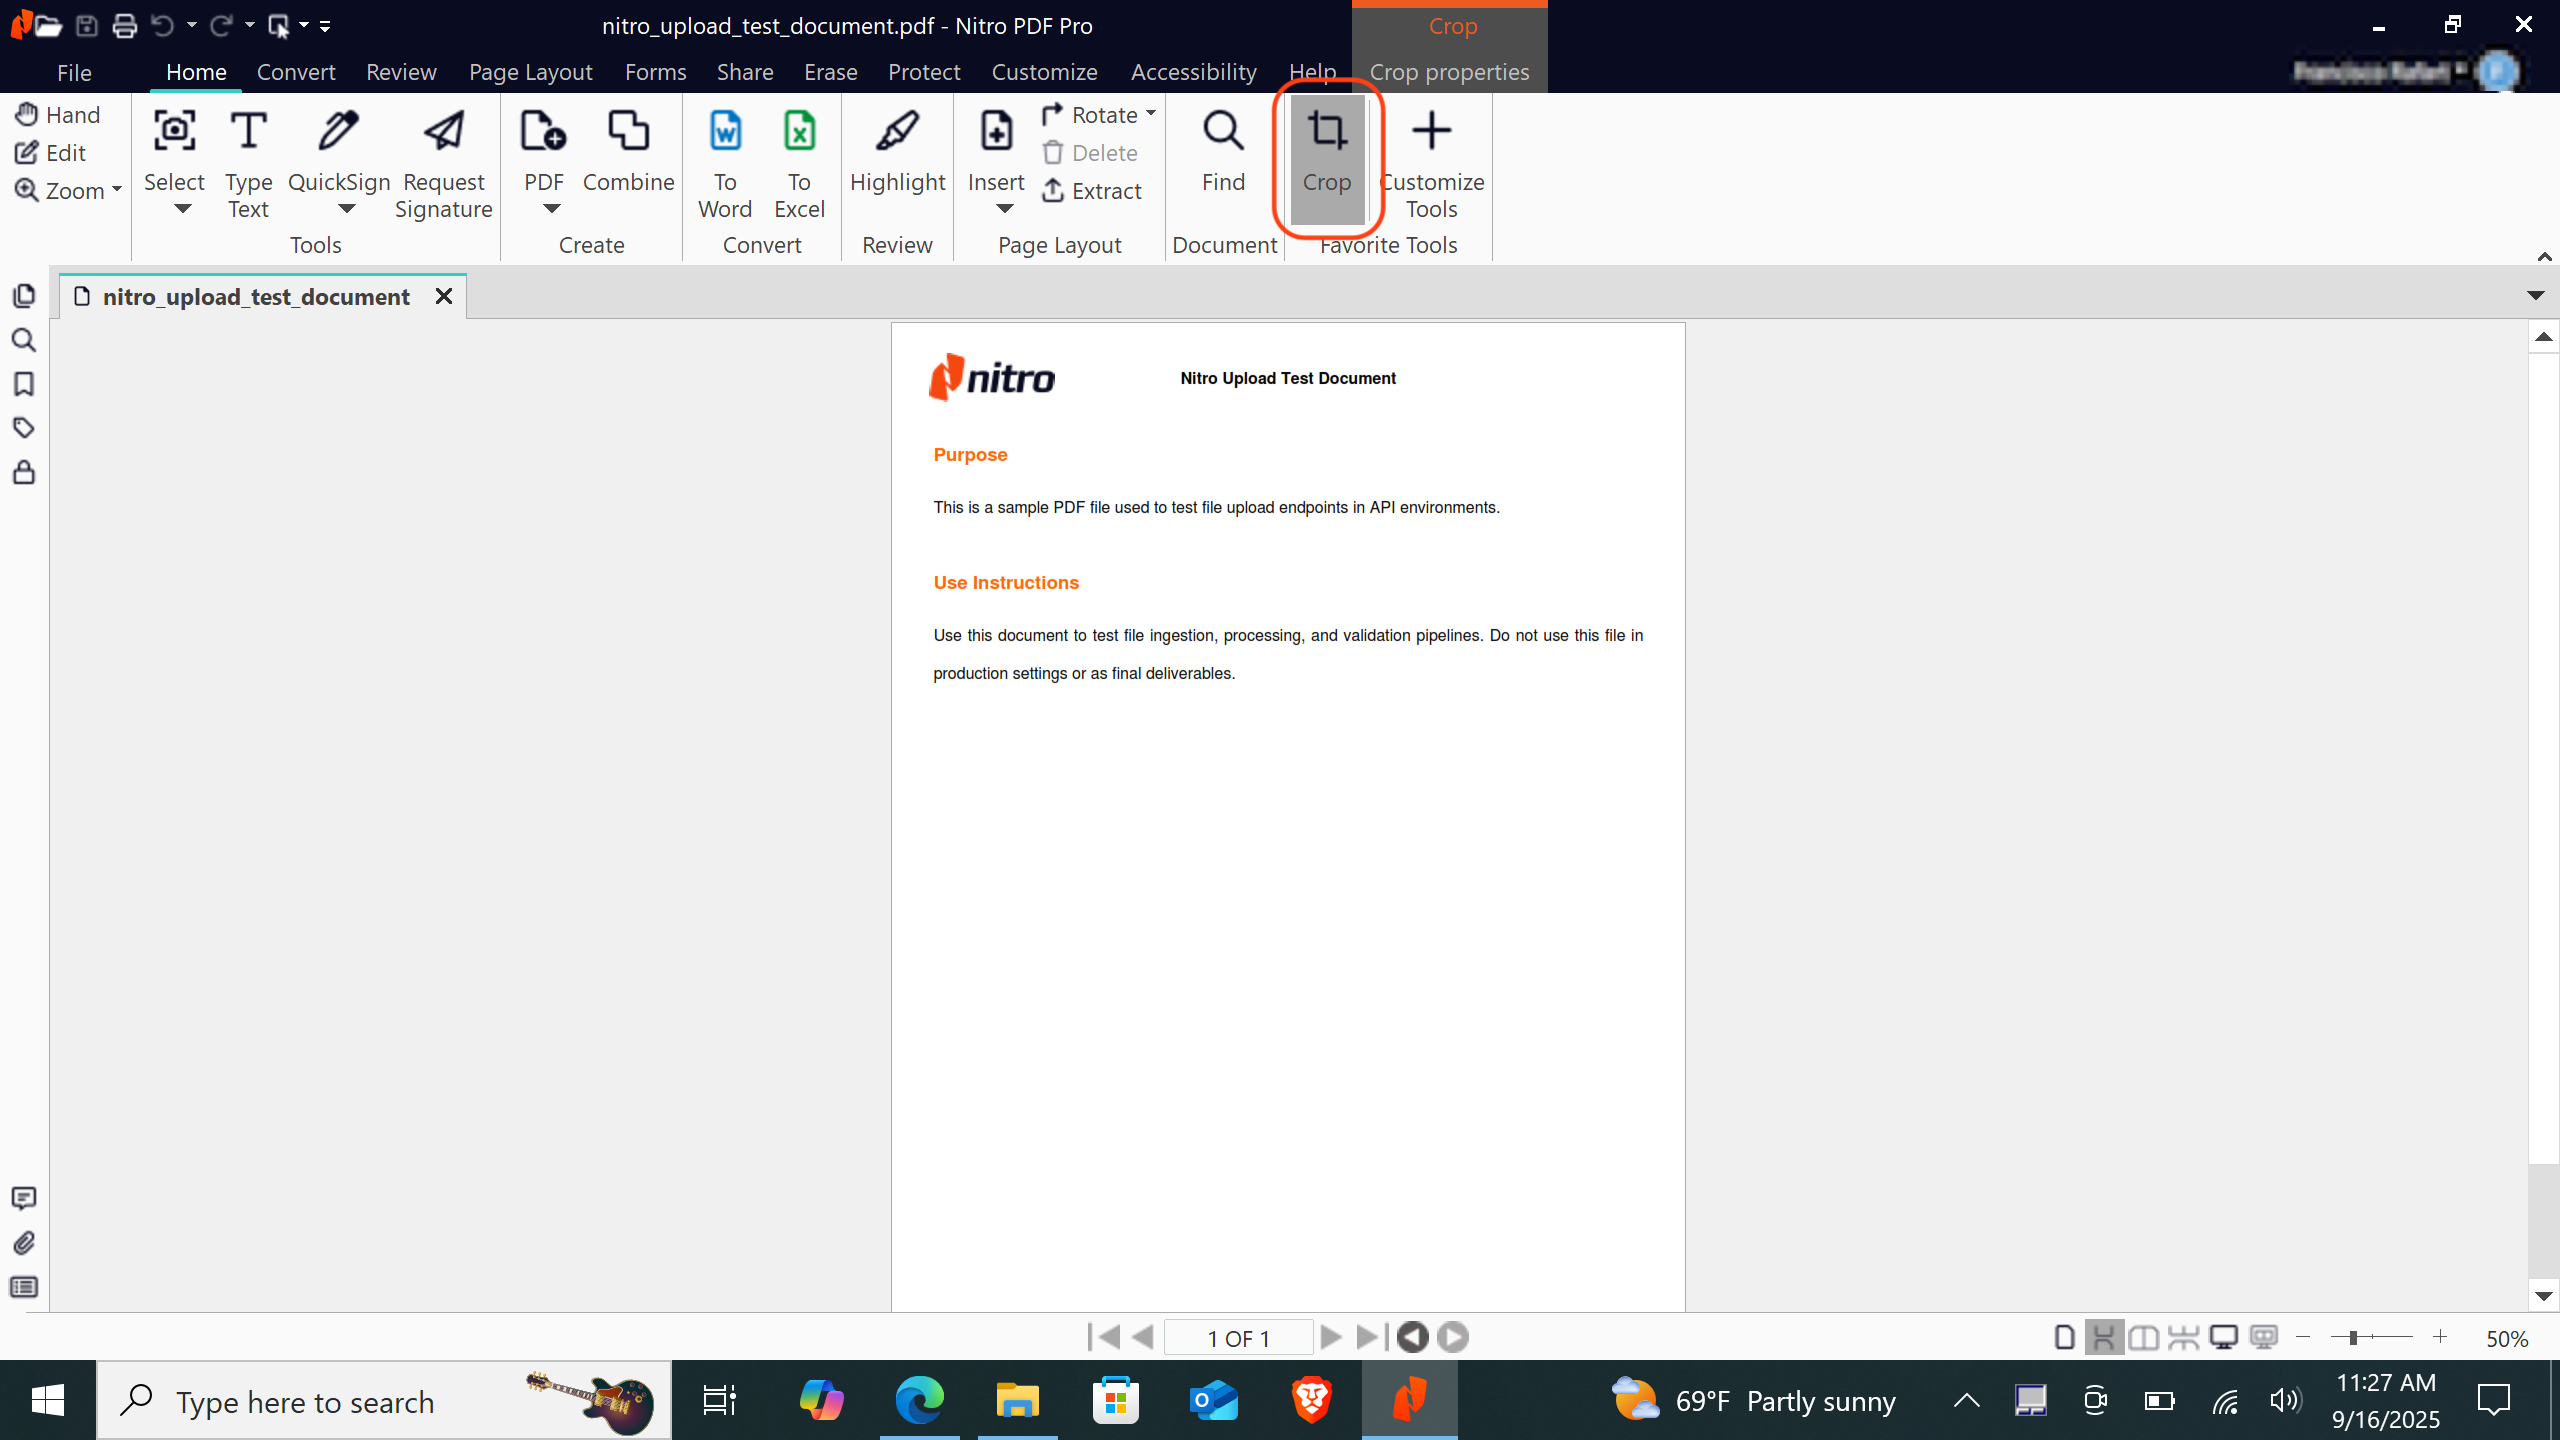 If the Crop tool is not available, you will need to add it:
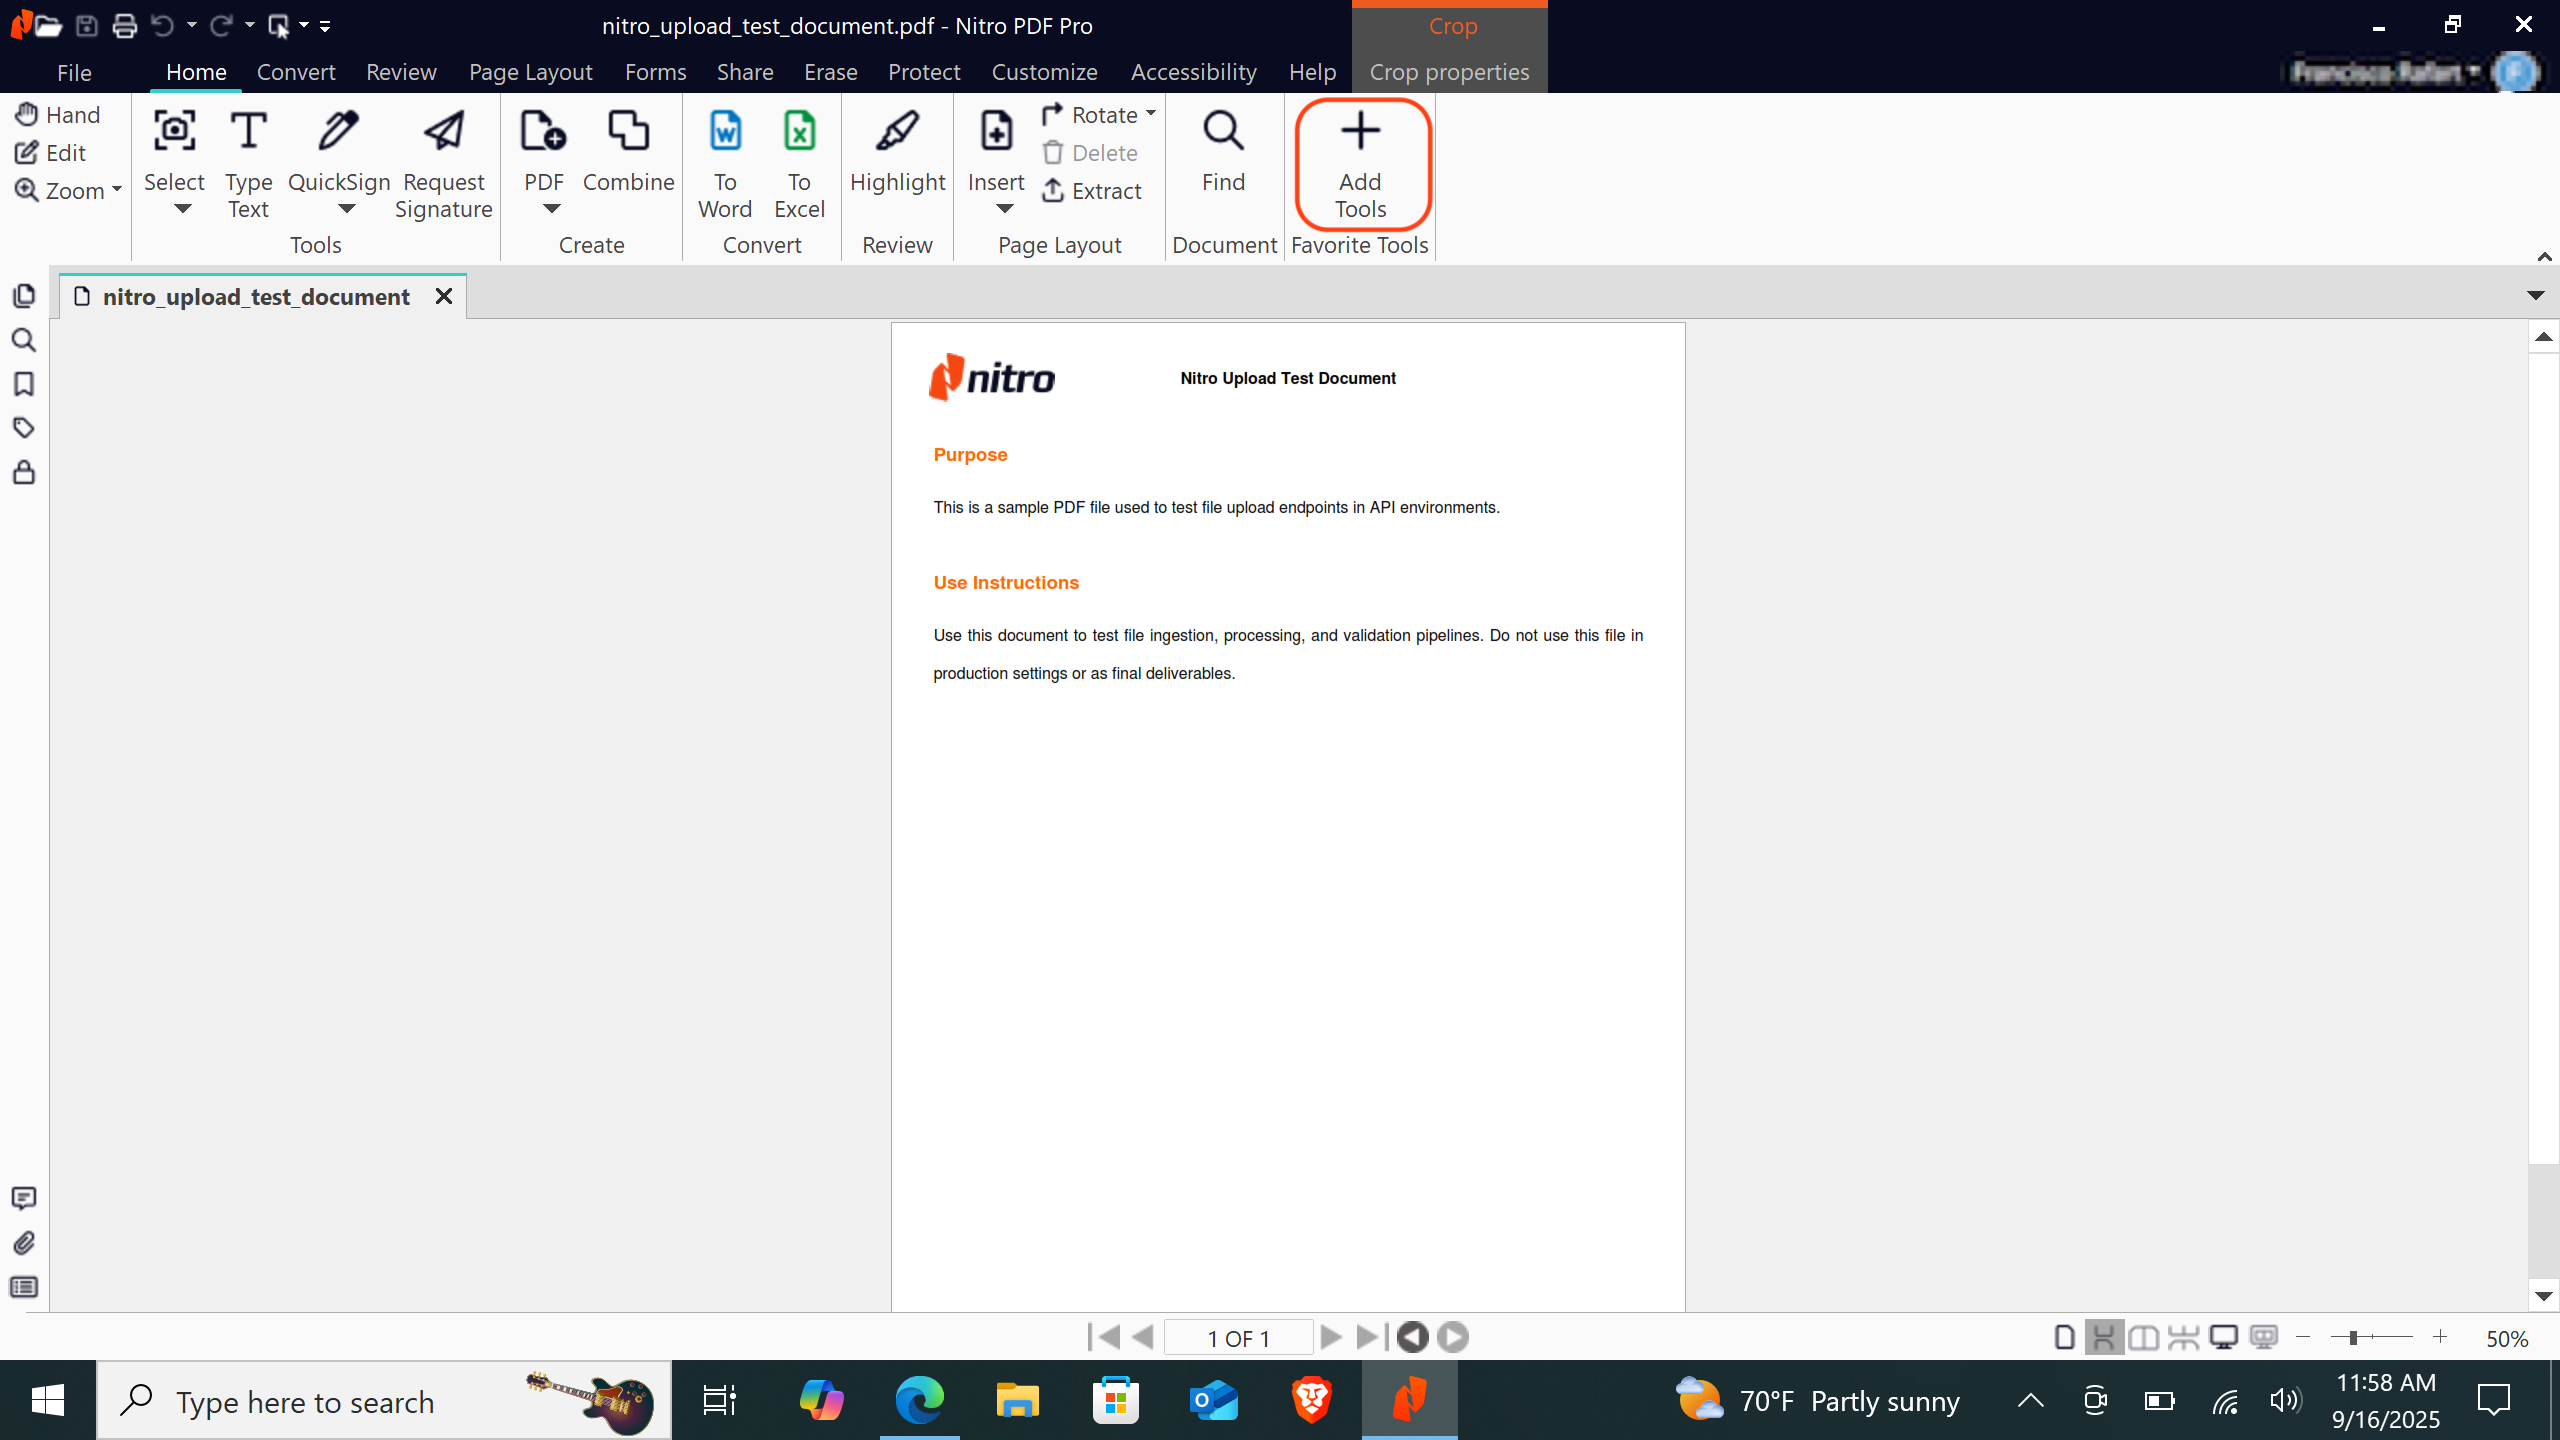
* Go to the `Home` tab in the navigation menu.
* Click `Add Tools` or `Customize Tools` in the upper-right corner of the application. A customization window will appear.
If the Crop tool is not available, you will need to add it:
* Go to the `Home` tab in the navigation menu.
* Click `Add Tools` or `Customize Tools` in the upper-right corner of the application. A customization window will appear.
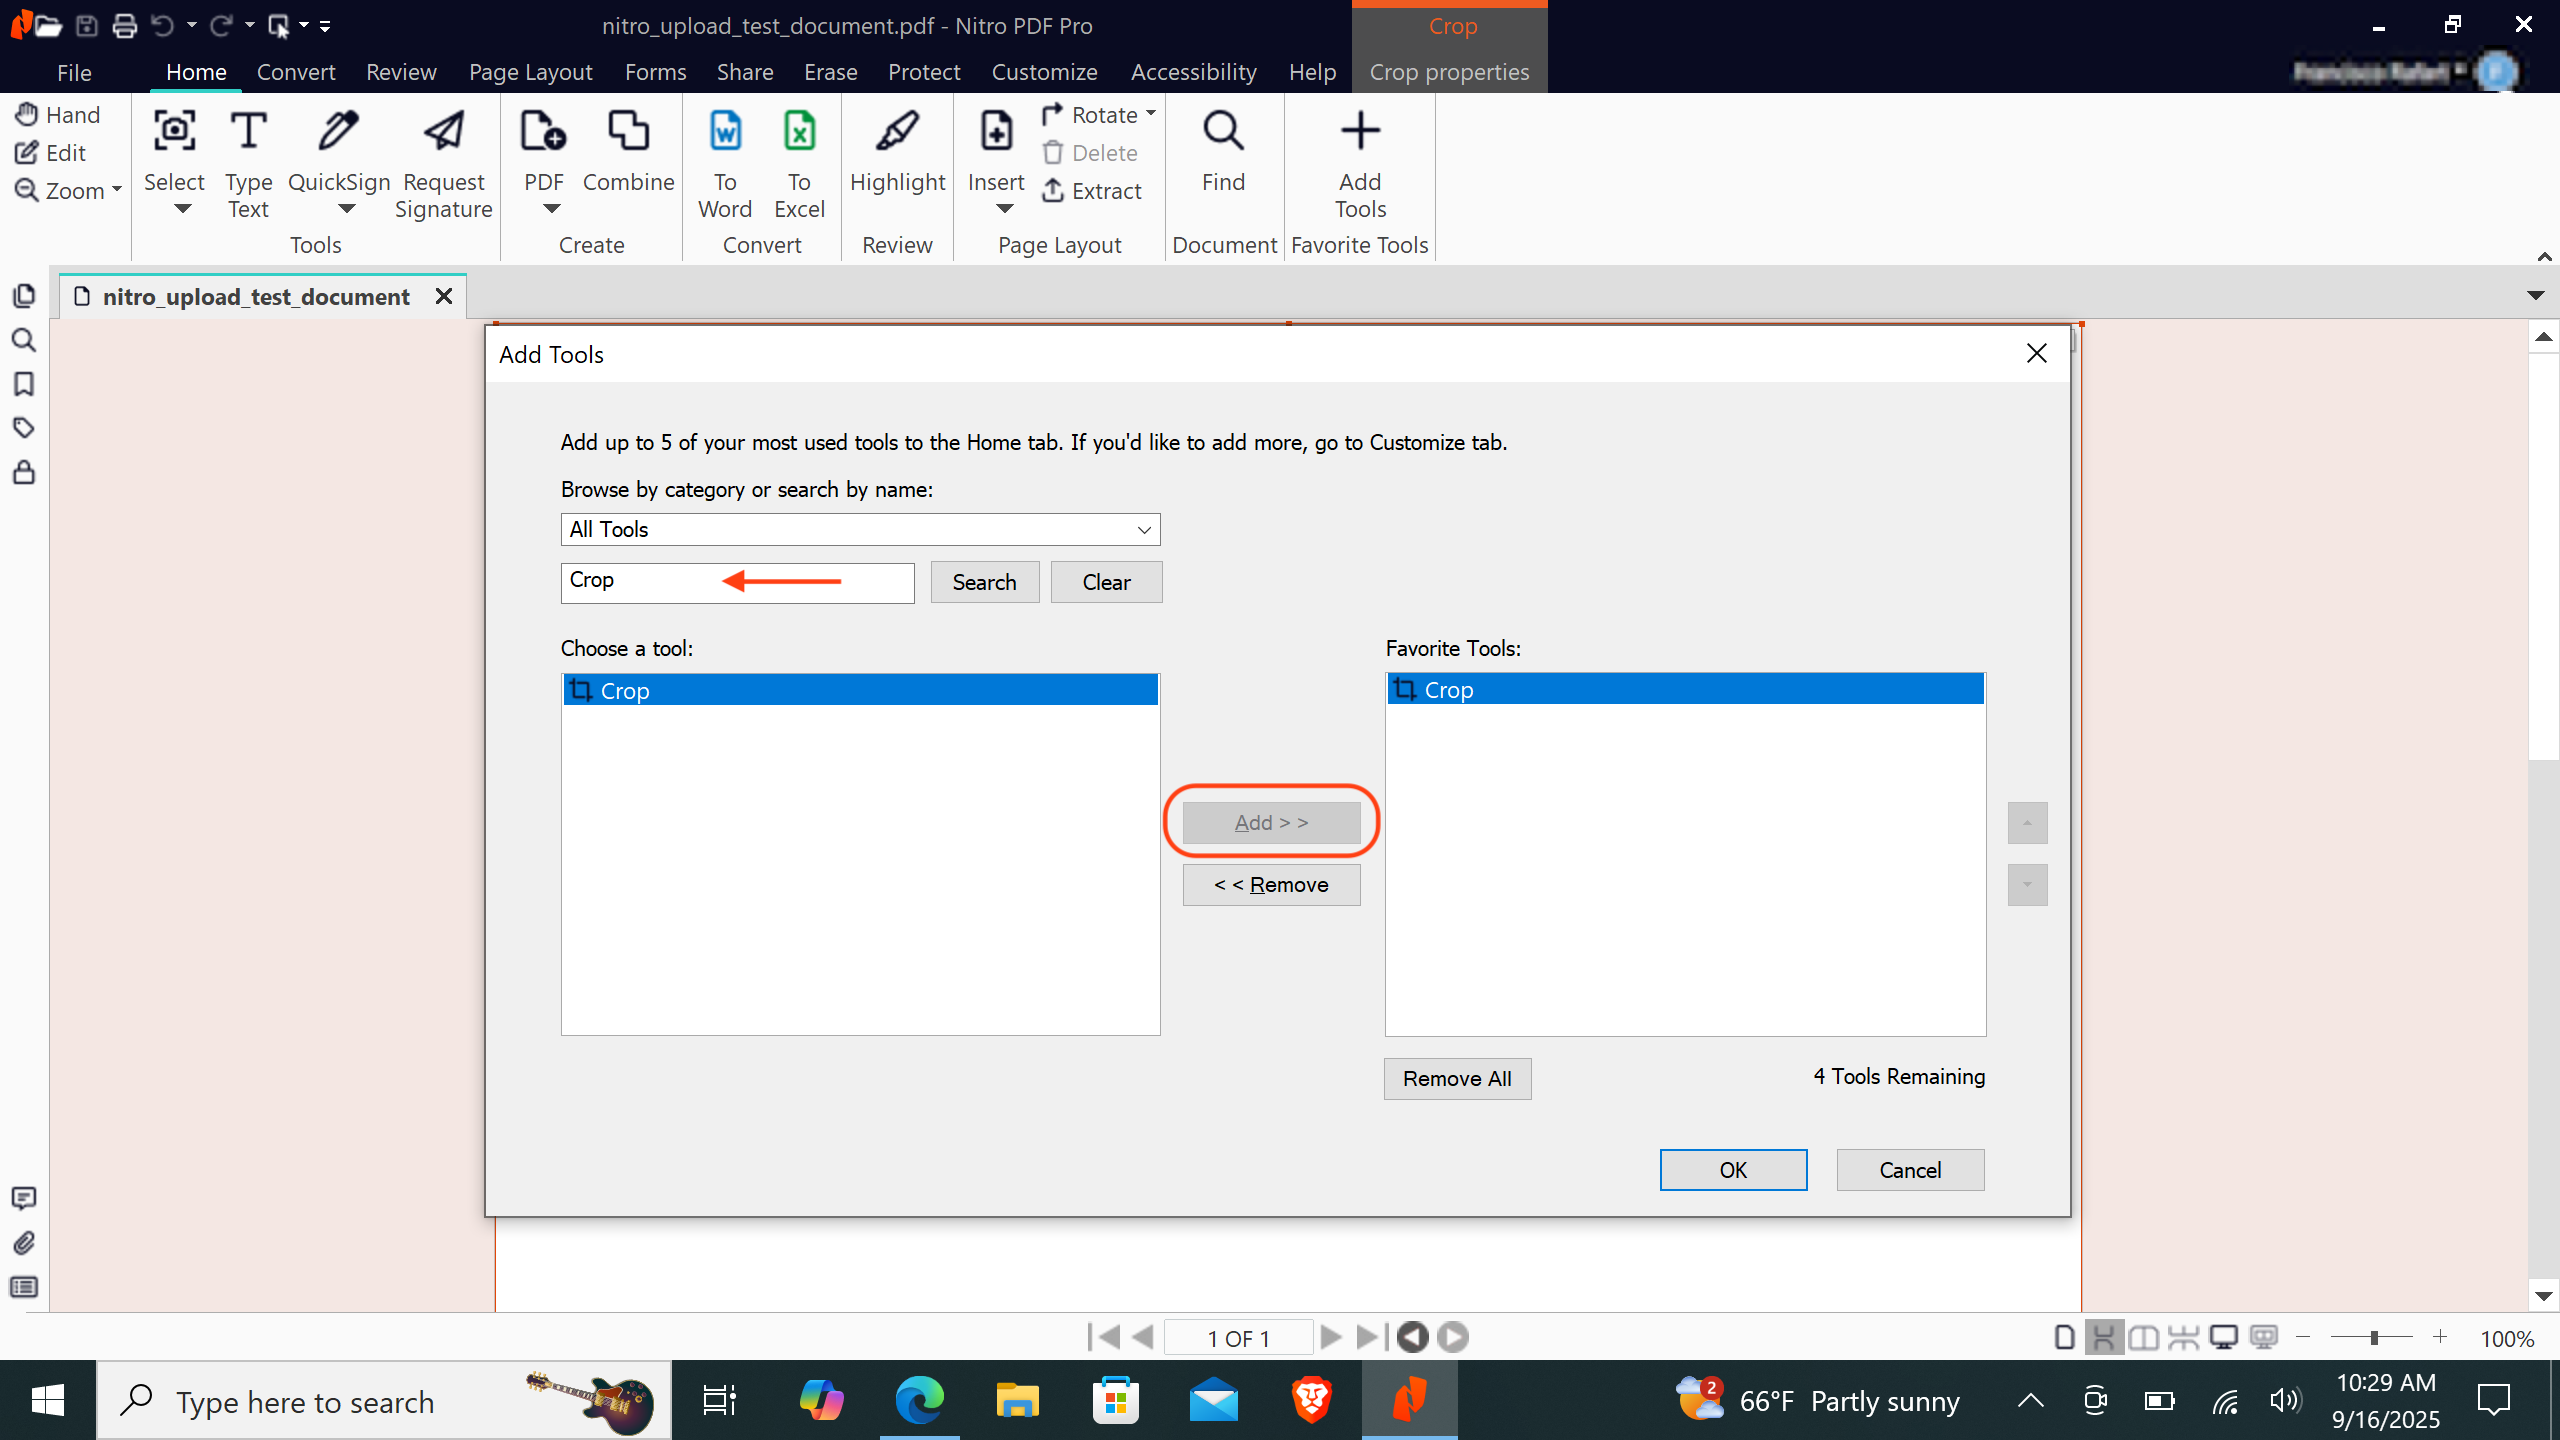
 * In the search bar, type `Crop` and click `Search`.
* Select `Crop` from the results and add it to your `Favorite` tools.
* Click `OK`. The `Crop` tool will now appear in your tools menu.
* Select the `Crop` tool to activate it.
* In the search bar, type `Crop` and click `Search`.
* Select `Crop` from the results and add it to your `Favorite` tools.
* Click `OK`. The `Crop` tool will now appear in your tools menu.
* Select the `Crop` tool to activate it.
 Using the **Crop tool**, draw a rectangle over the area of the document where you want the field to appear.
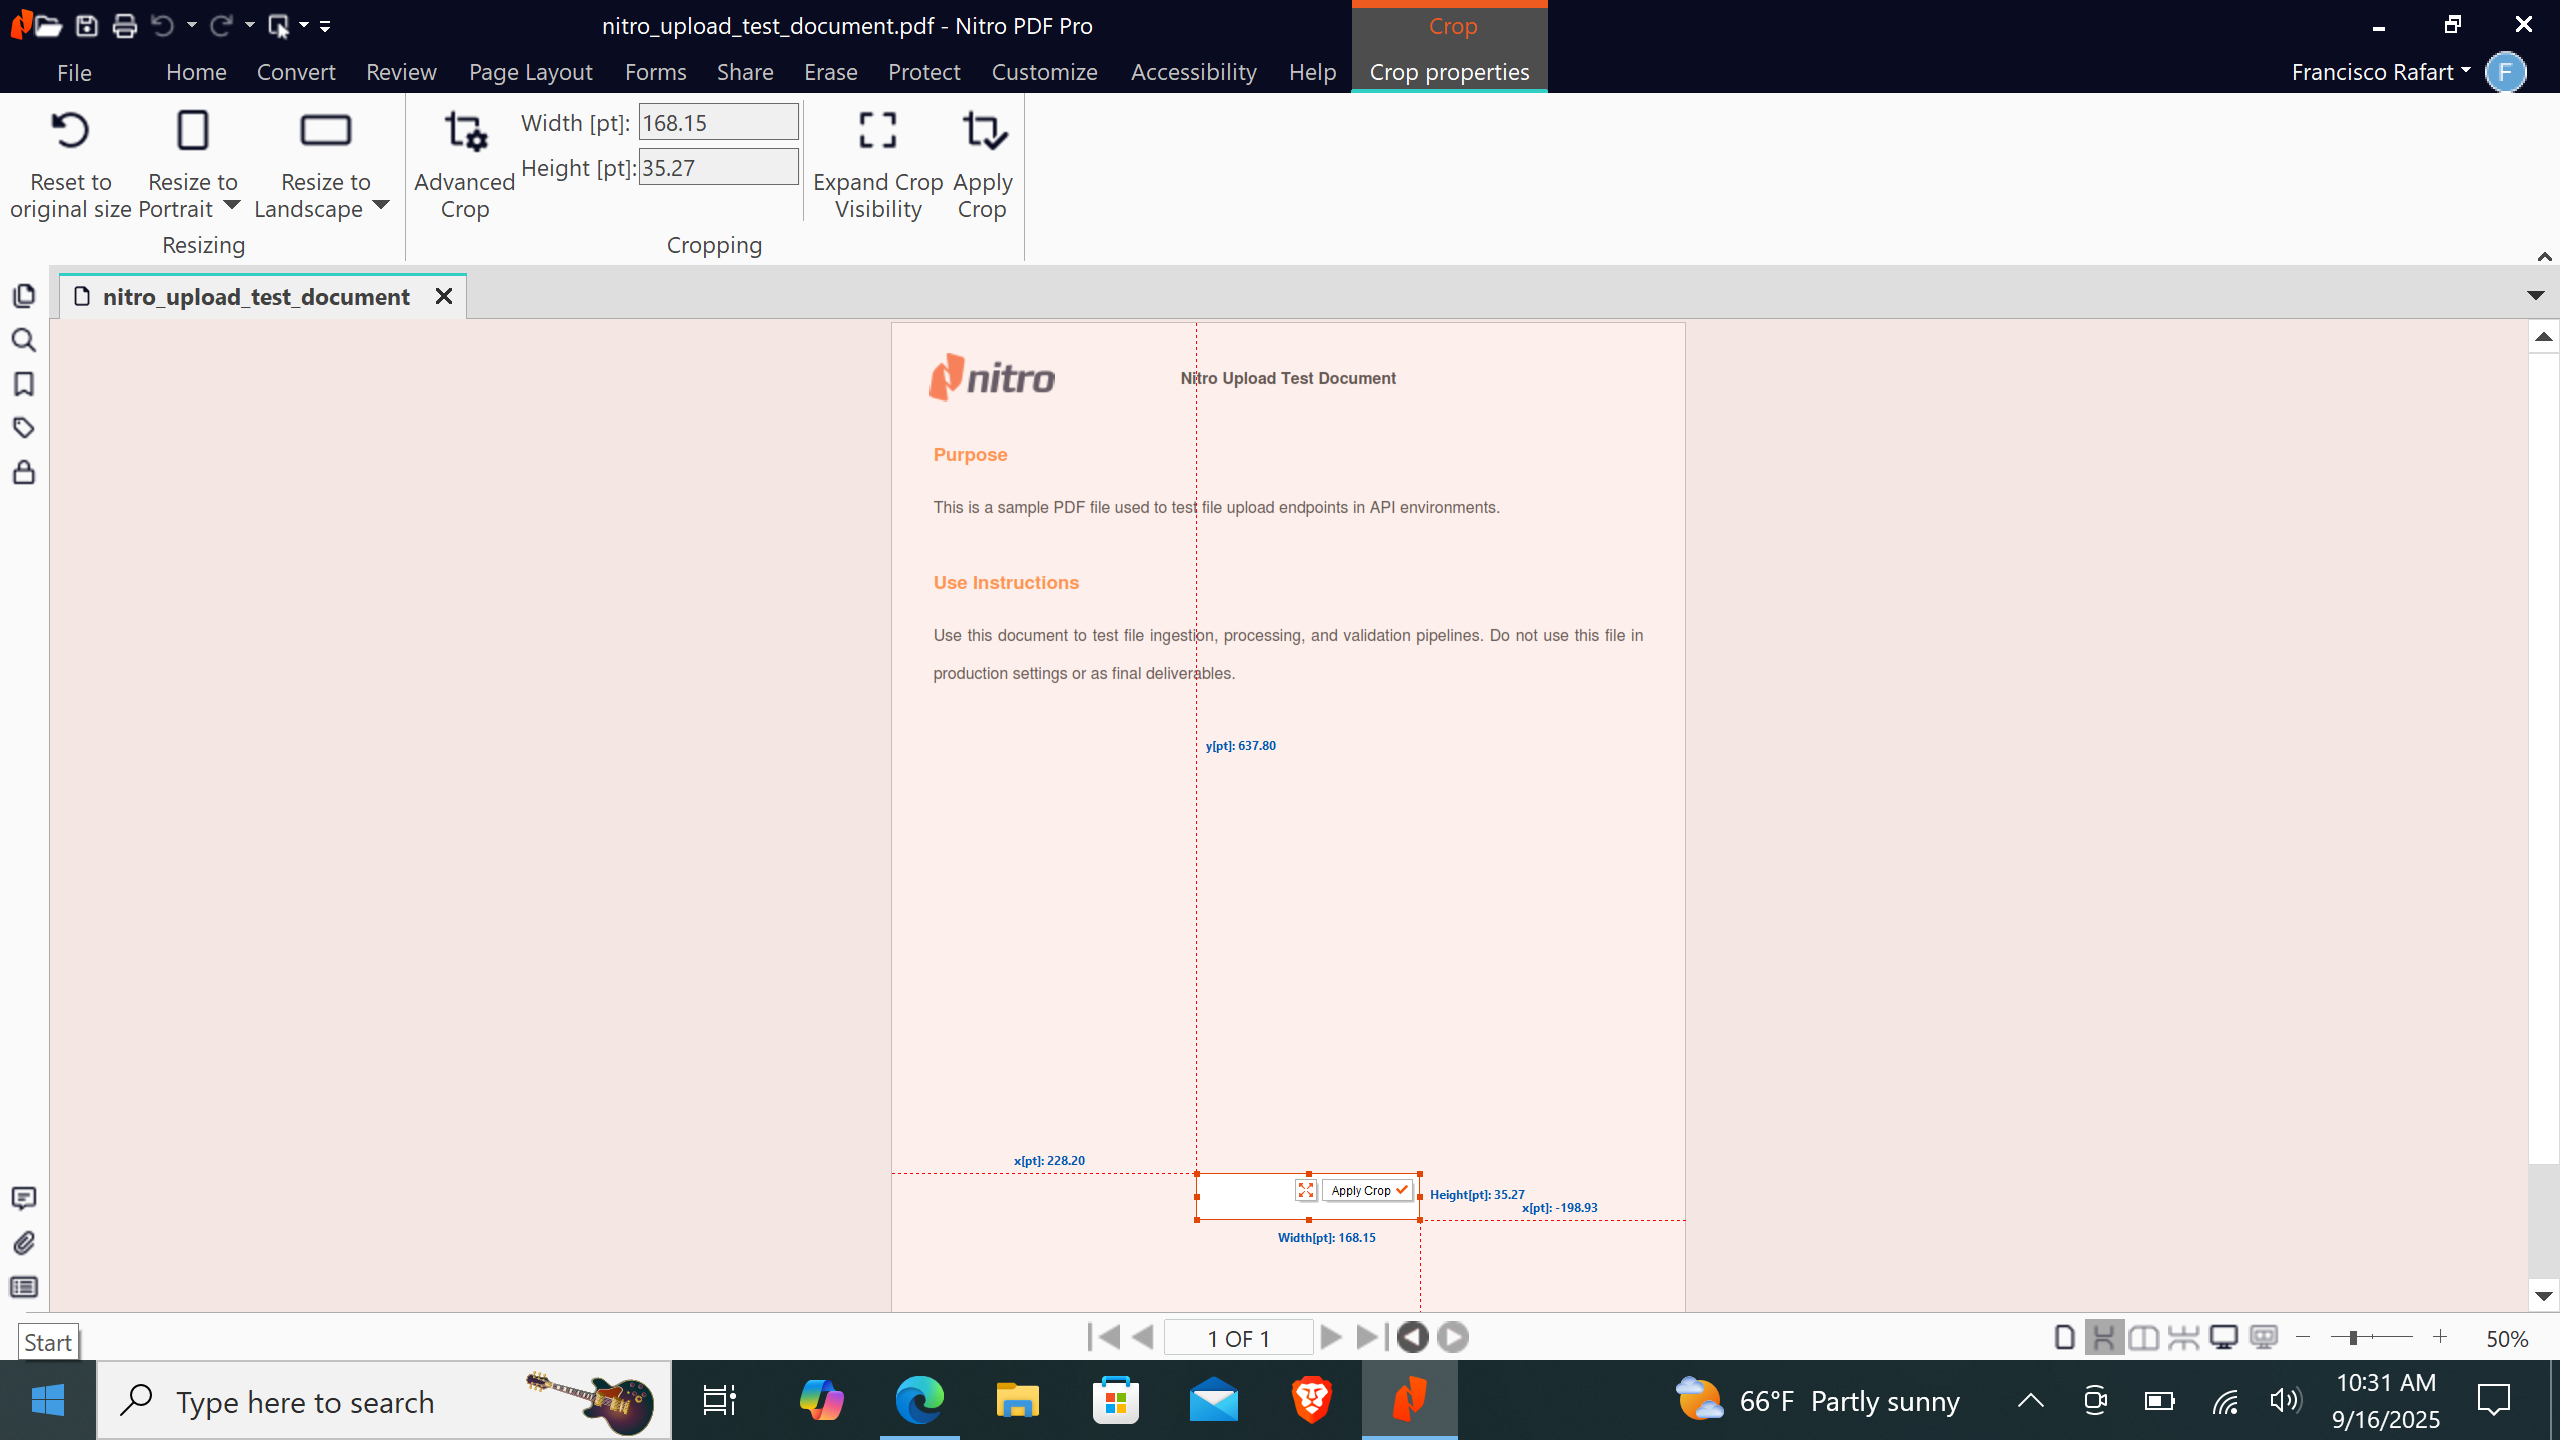 When you draw a box with the Nitro PDF **Crop** tool, it will display a series of measurements.
To obtain the first corner (`x`, `y`) of your rectangle:
* The **left-side** measurement corresponds to `x`.
* Example: `228.2 pt`
* The **top-side** measurement corresponds to `y`.
* Example: `637.8 pt`
When you draw a box with the Nitro PDF **Crop** tool, it will display a series of measurements.
To obtain the first corner (`x`, `y`) of your rectangle:
* The **left-side** measurement corresponds to `x`.
* Example: `228.2 pt`
* The **top-side** measurement corresponds to `y`.
* Example: `637.8 pt`
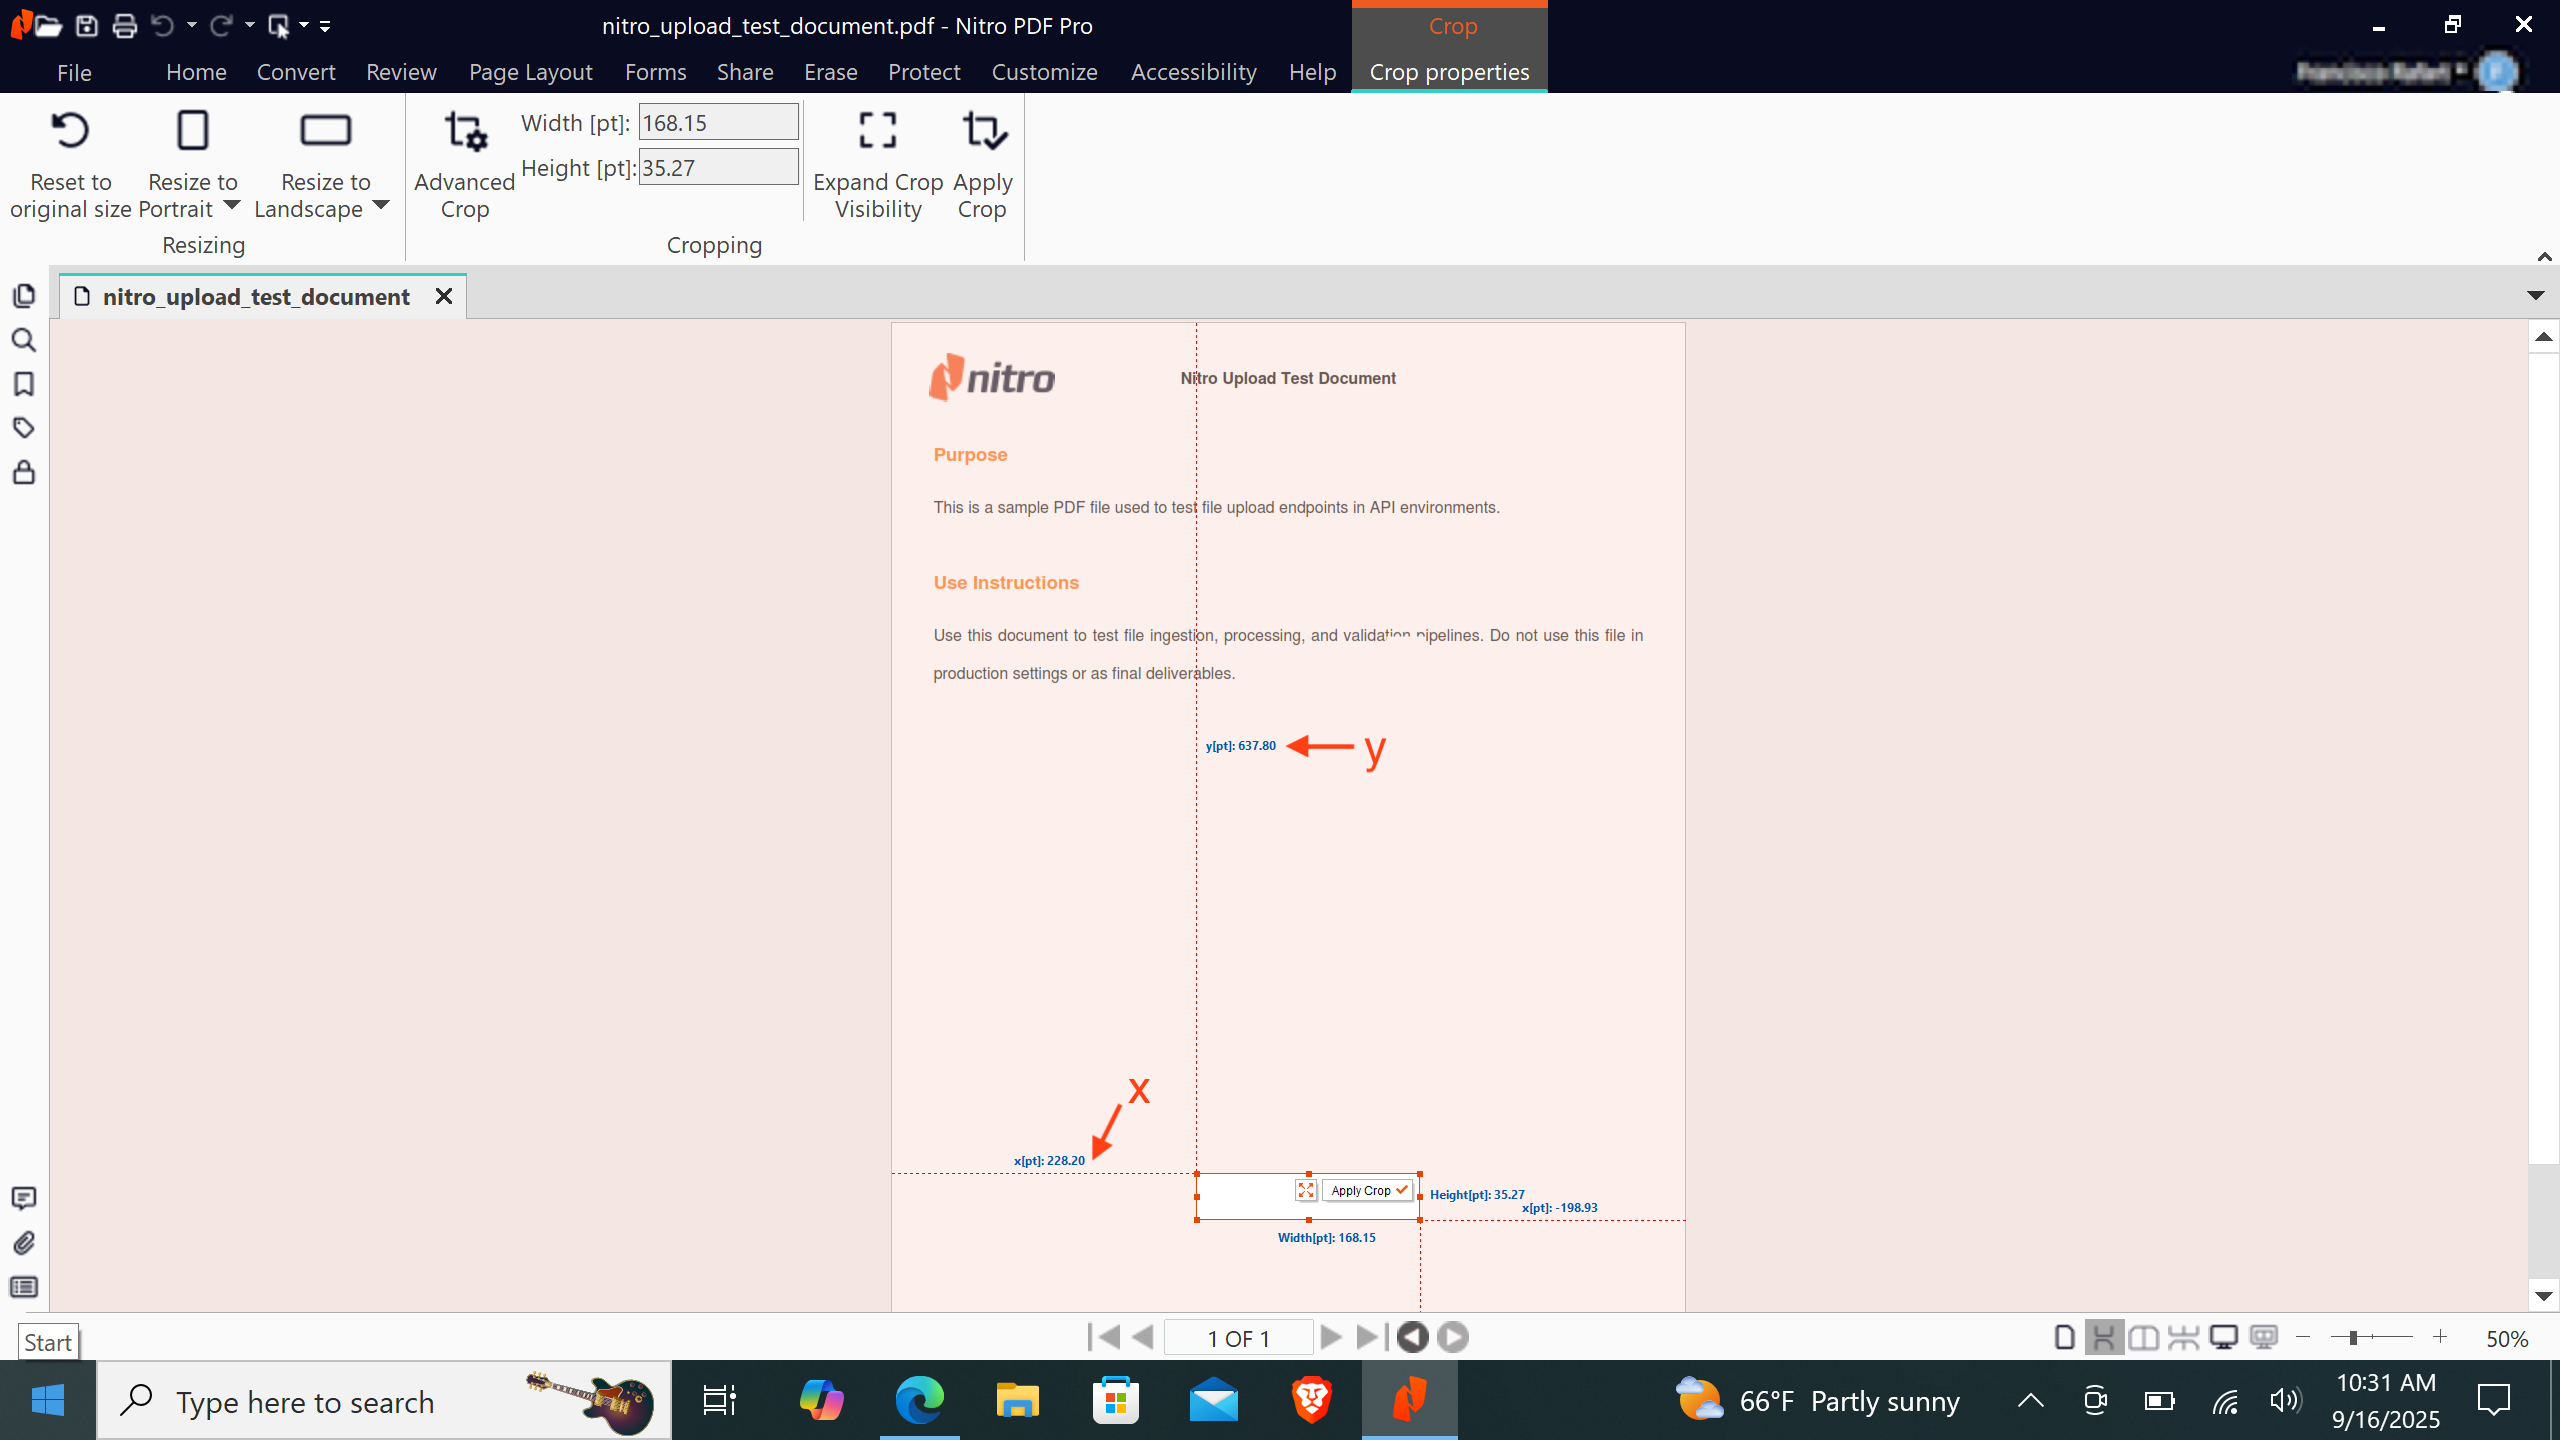 Using the same measurements from the **Crop** tool.
* First, note the **width** measurement of the rectangle.
* Example: `w = 168.15 pt`
* Next, note the **height** measurement of the rectangle.
* Example: `h = 35.27 pt`
Using the same measurements from the **Crop** tool.
* First, note the **width** measurement of the rectangle.
* Example: `w = 168.15 pt`
* Next, note the **height** measurement of the rectangle.
* Example: `h = 35.27 pt`
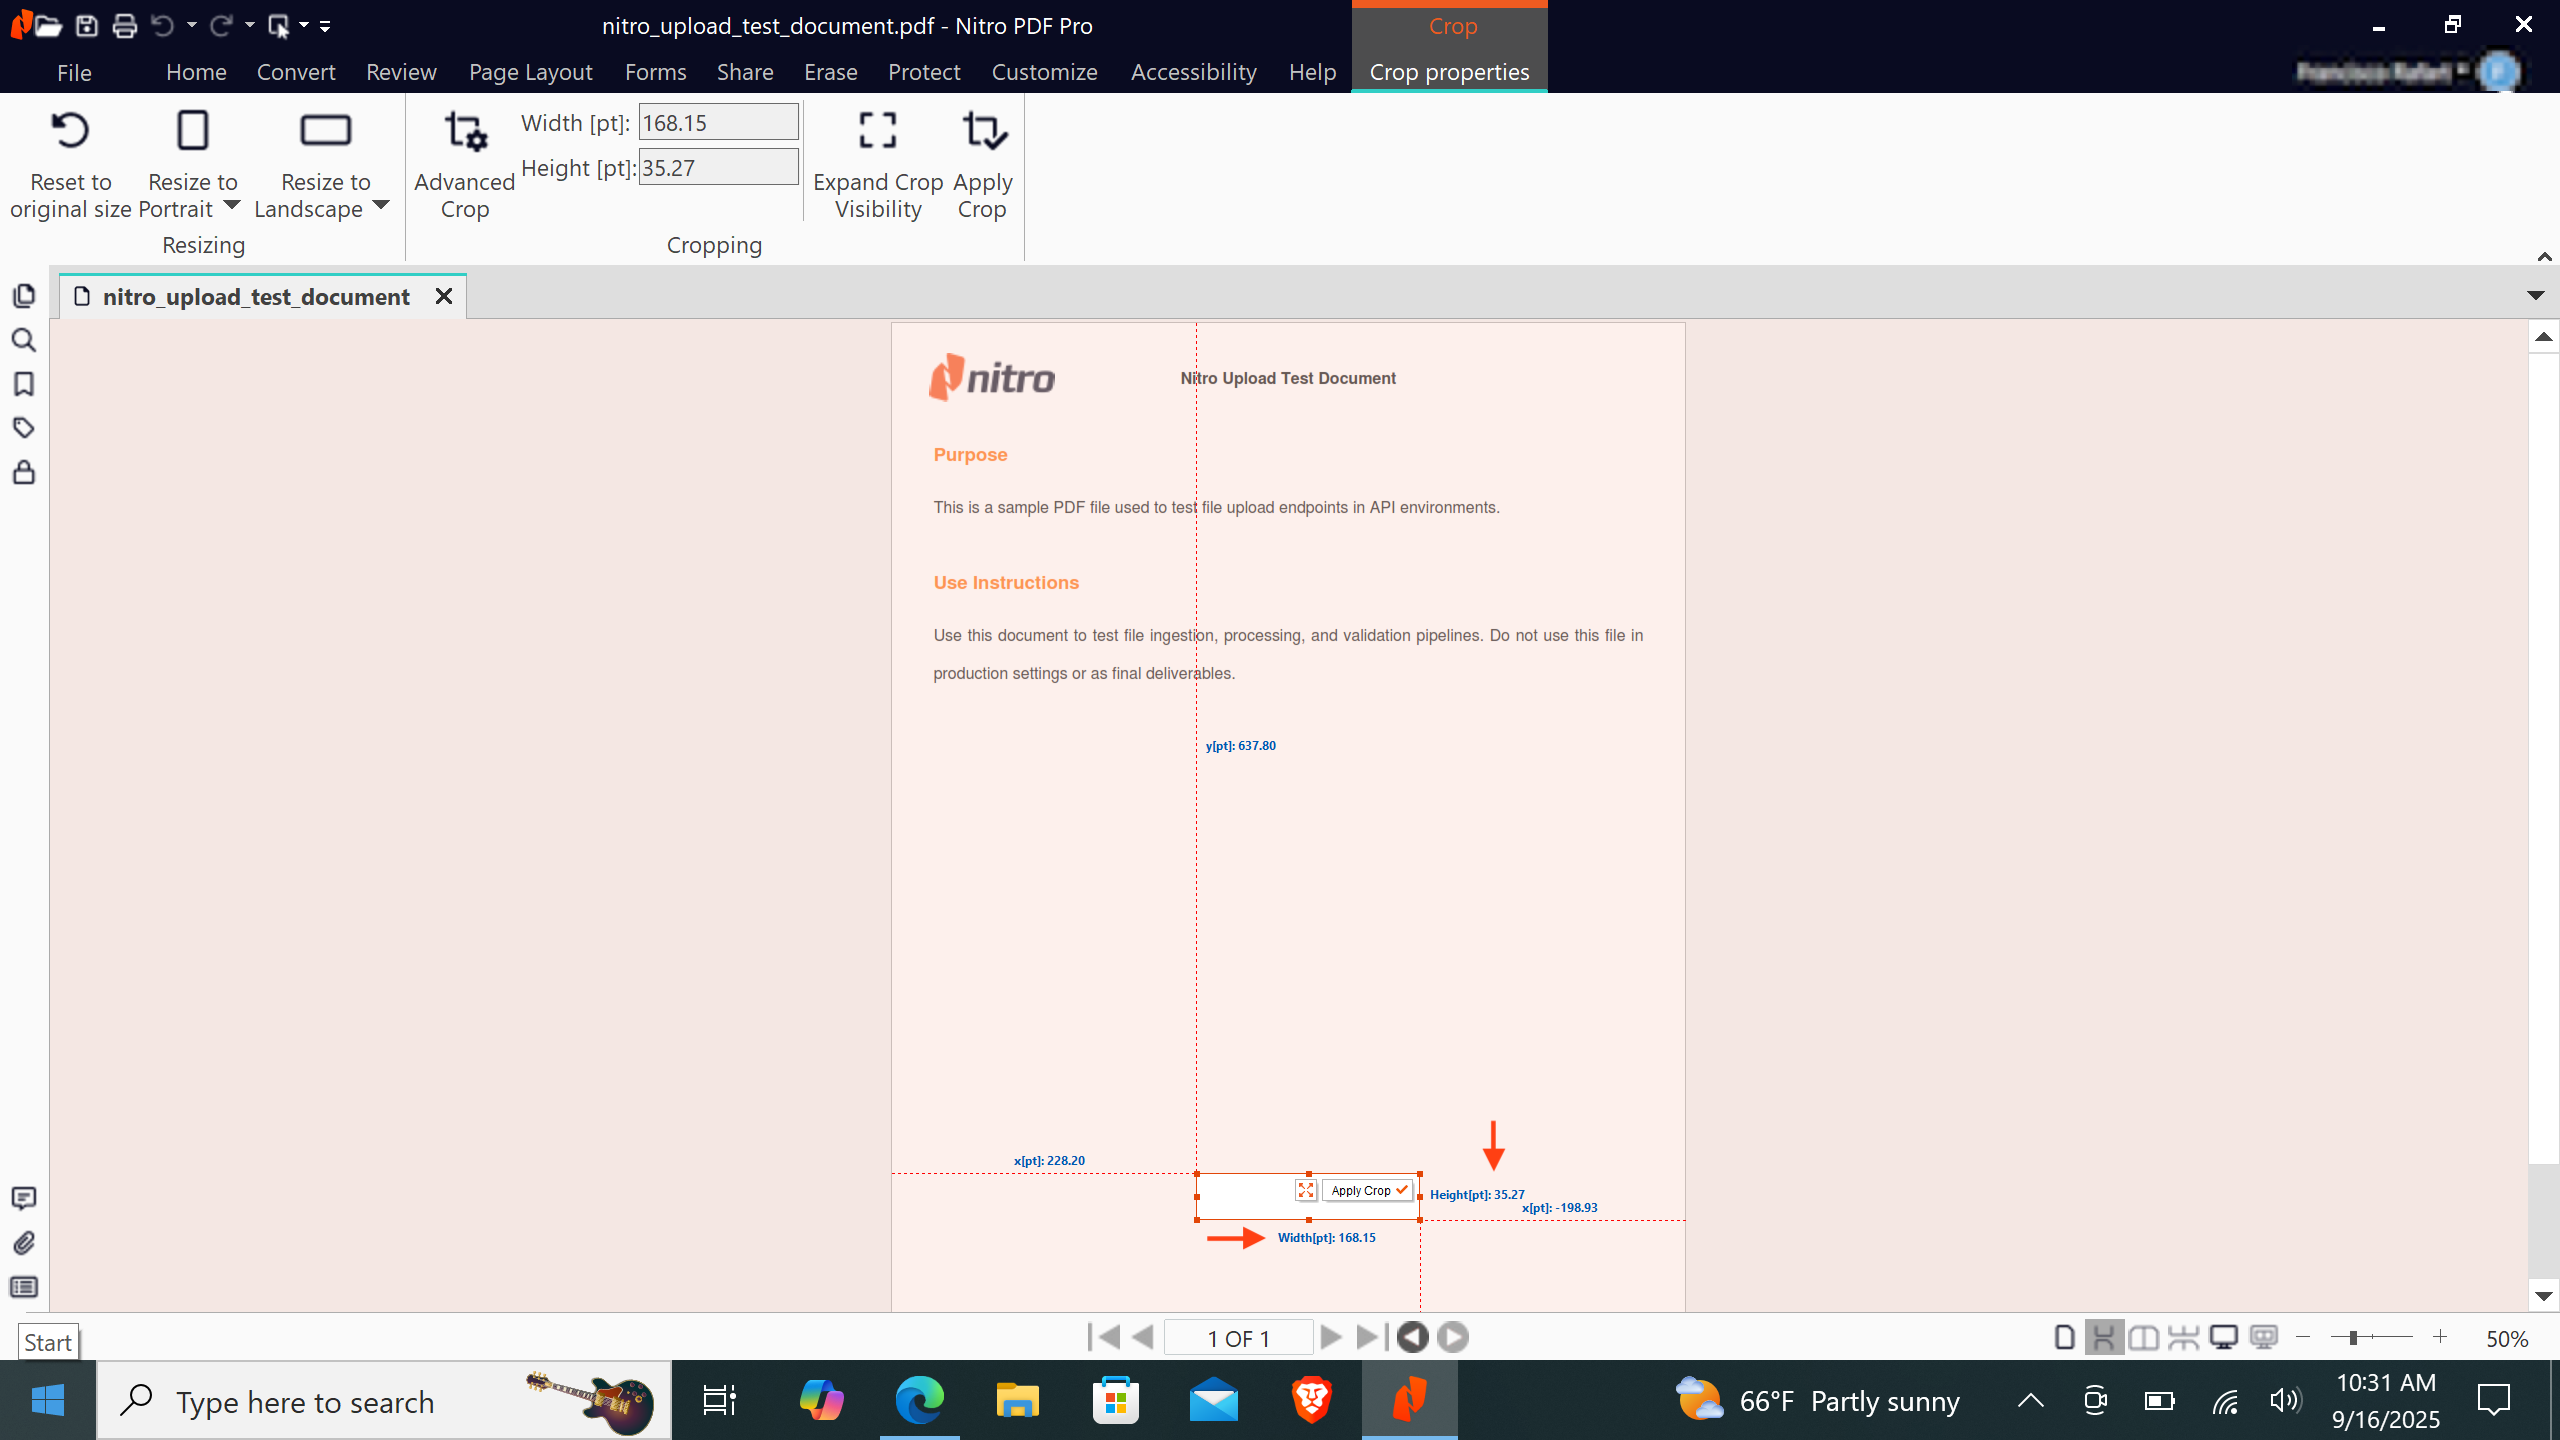 Given the measurements from the example above, the bounding box array to use in the **Create Field** API call is:
```json theme={null}
"boundingBox": [228.2, 637.8, 168.15, 35.27]
```
Nitro PDF is available for Mac OS. You can download it in the user portal.
Open a PDF document with Nitro PDF.
Given the measurements from the example above, the bounding box array to use in the **Create Field** API call is:
```json theme={null}
"boundingBox": [228.2, 637.8, 168.15, 35.27]
```
Nitro PDF is available for Mac OS. You can download it in the user portal.
Open a PDF document with Nitro PDF.
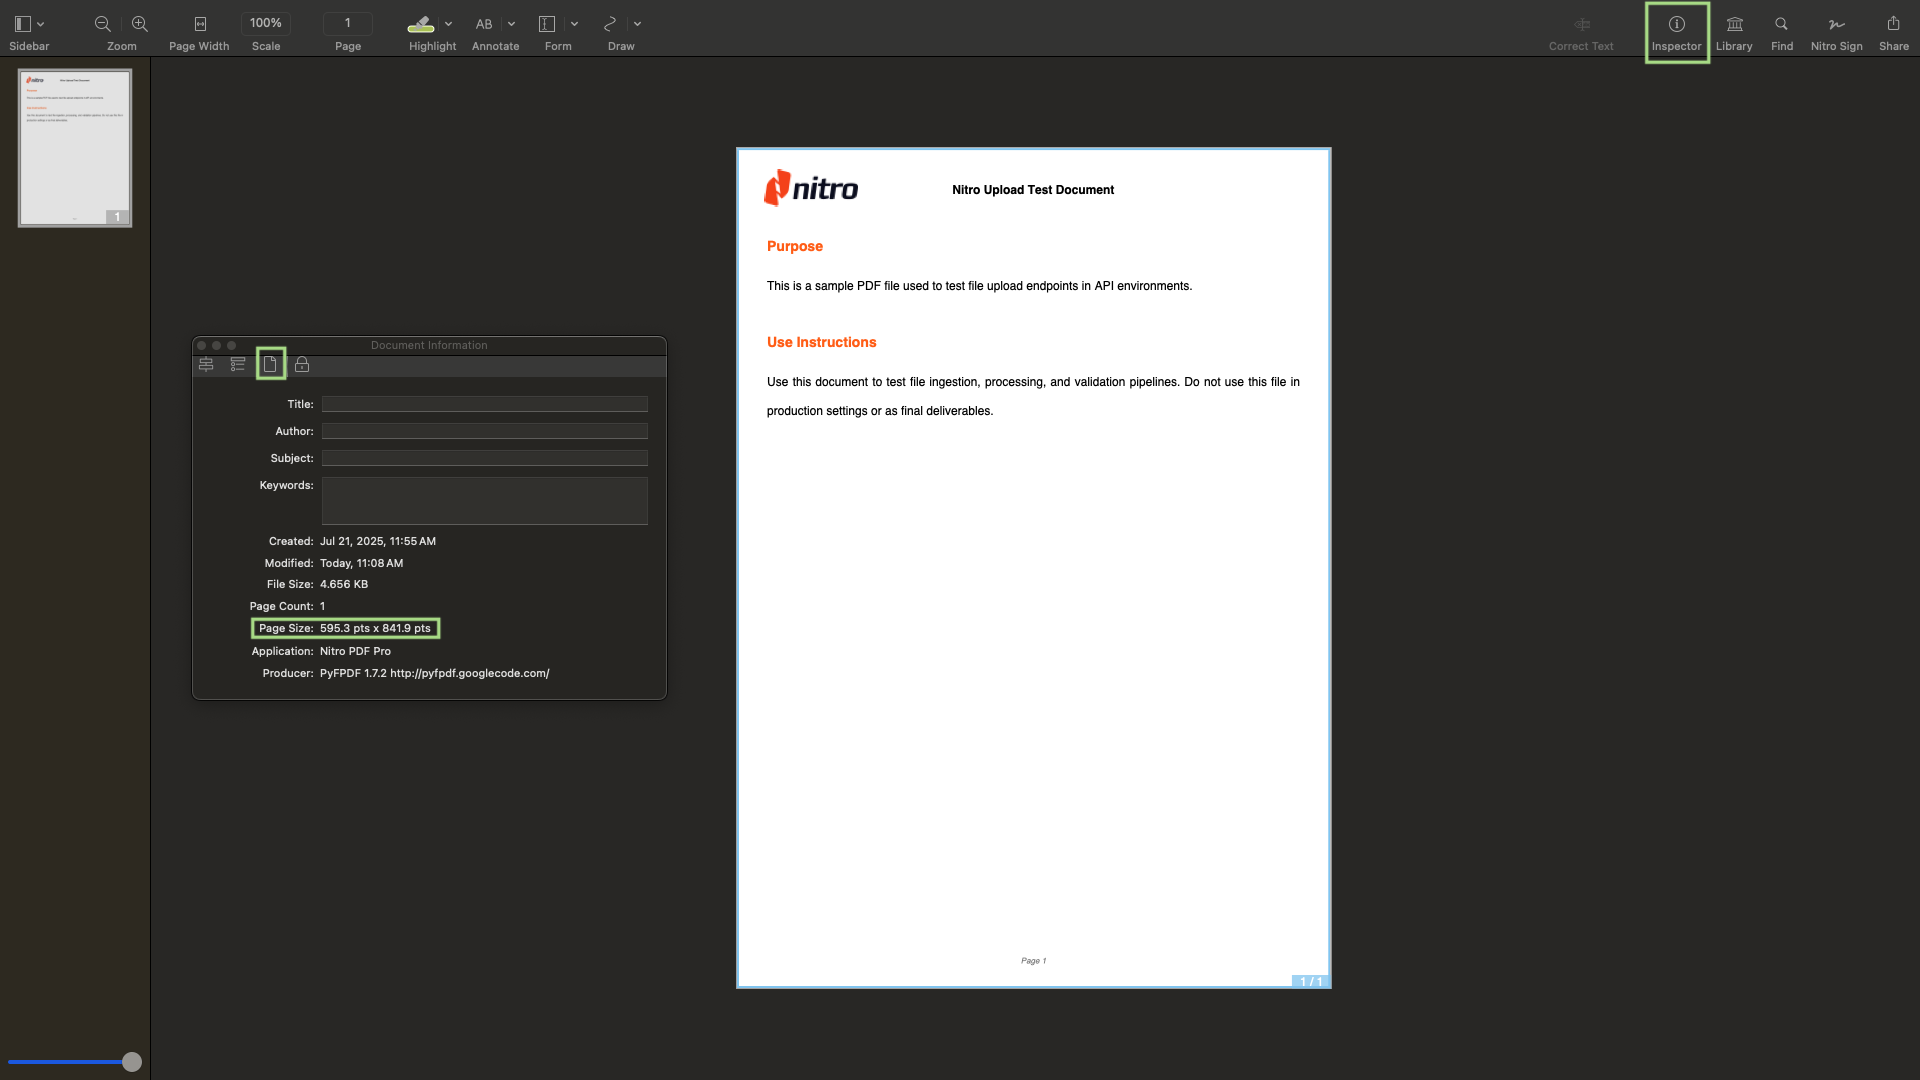
 The first step after opening the document is to click on the **Inspector** located in the top-right corner.
In the floating window that appears, select the **Document Information** tab .
Take note of the document dimensions shown under **Page Size**.
In the example, the document size is `595.3 pt x 841.9 pt`.
The first step after opening the document is to click on the **Inspector** located in the top-right corner.
In the floating window that appears, select the **Document Information** tab .
Take note of the document dimensions shown under **Page Size**.
In the example, the document size is `595.3 pt x 841.9 pt`.
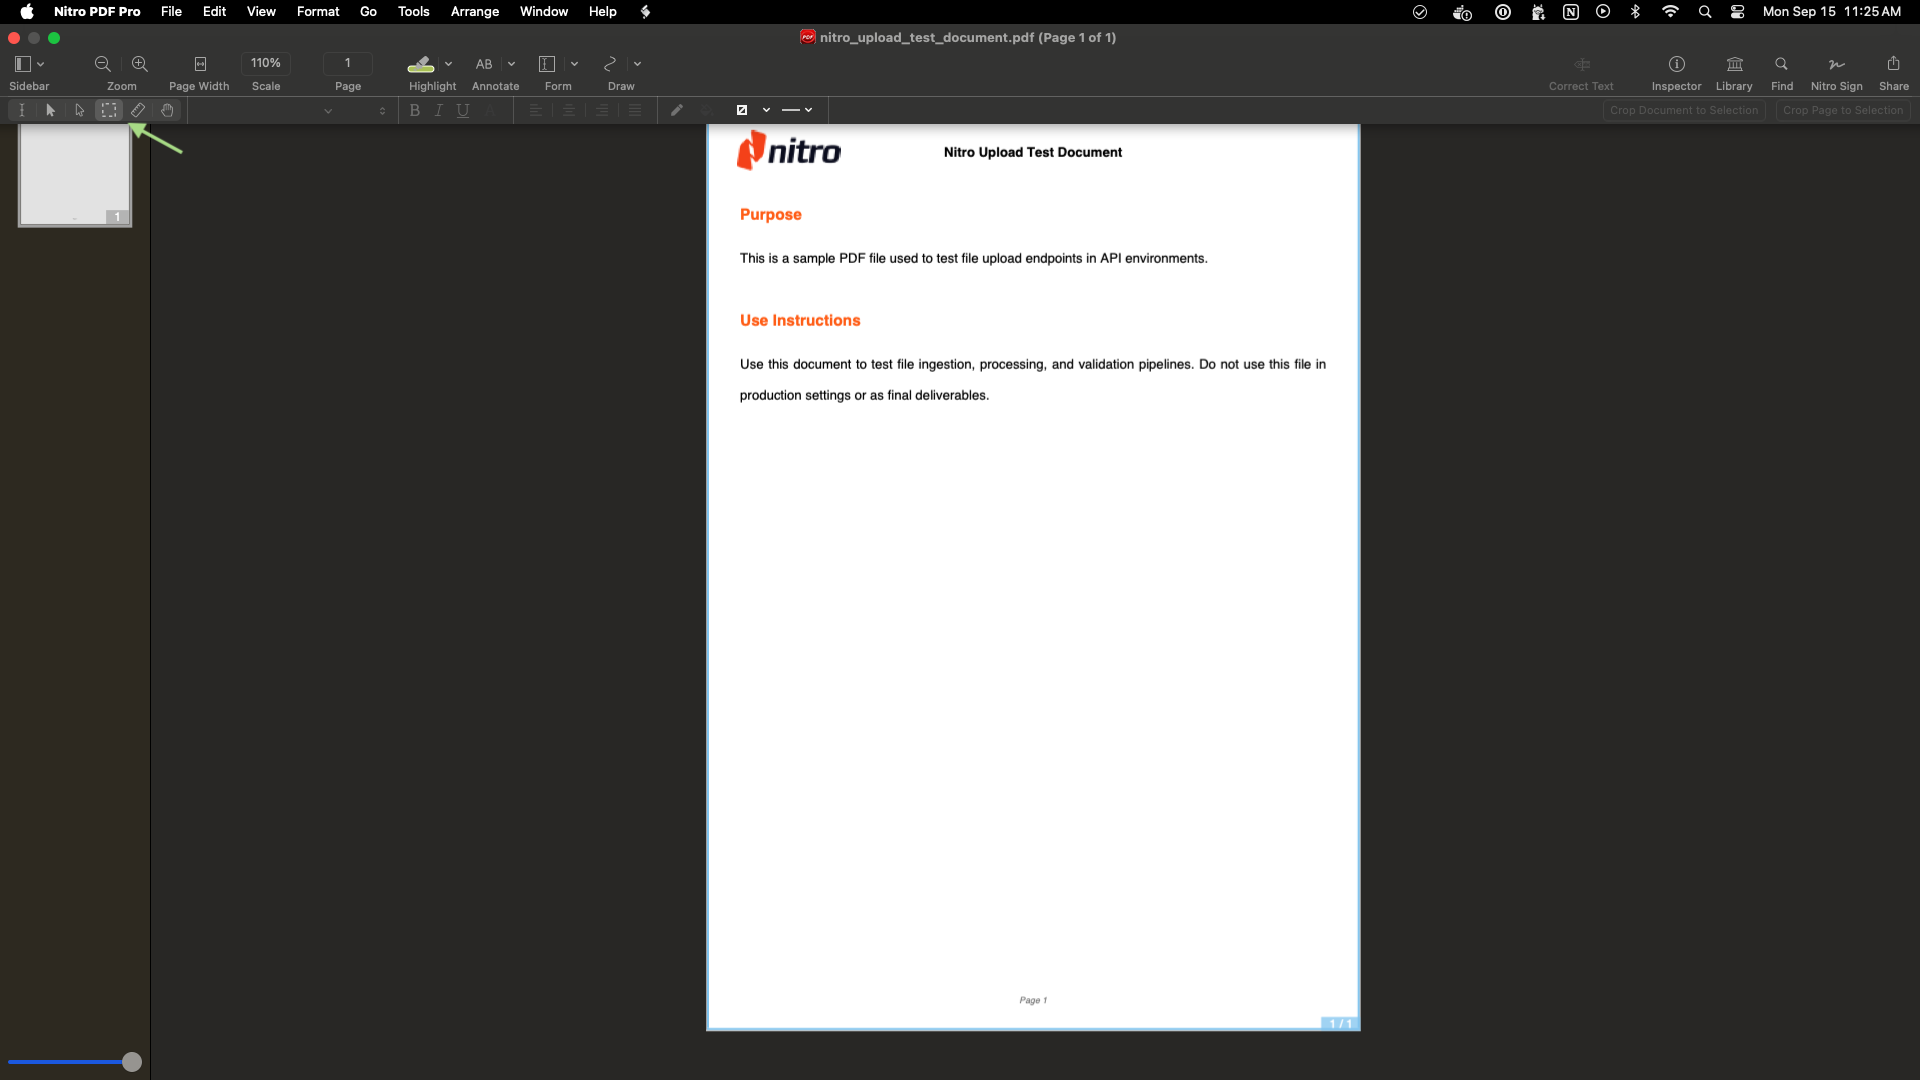
 Scroll to the top of the Nitro PDF window until the tool menu expands. Then, click on the **Select Rectangle** tool .
 Using the **Select Rectangle** tool, draw a rectangle over the area where you want the field to appear in the document.
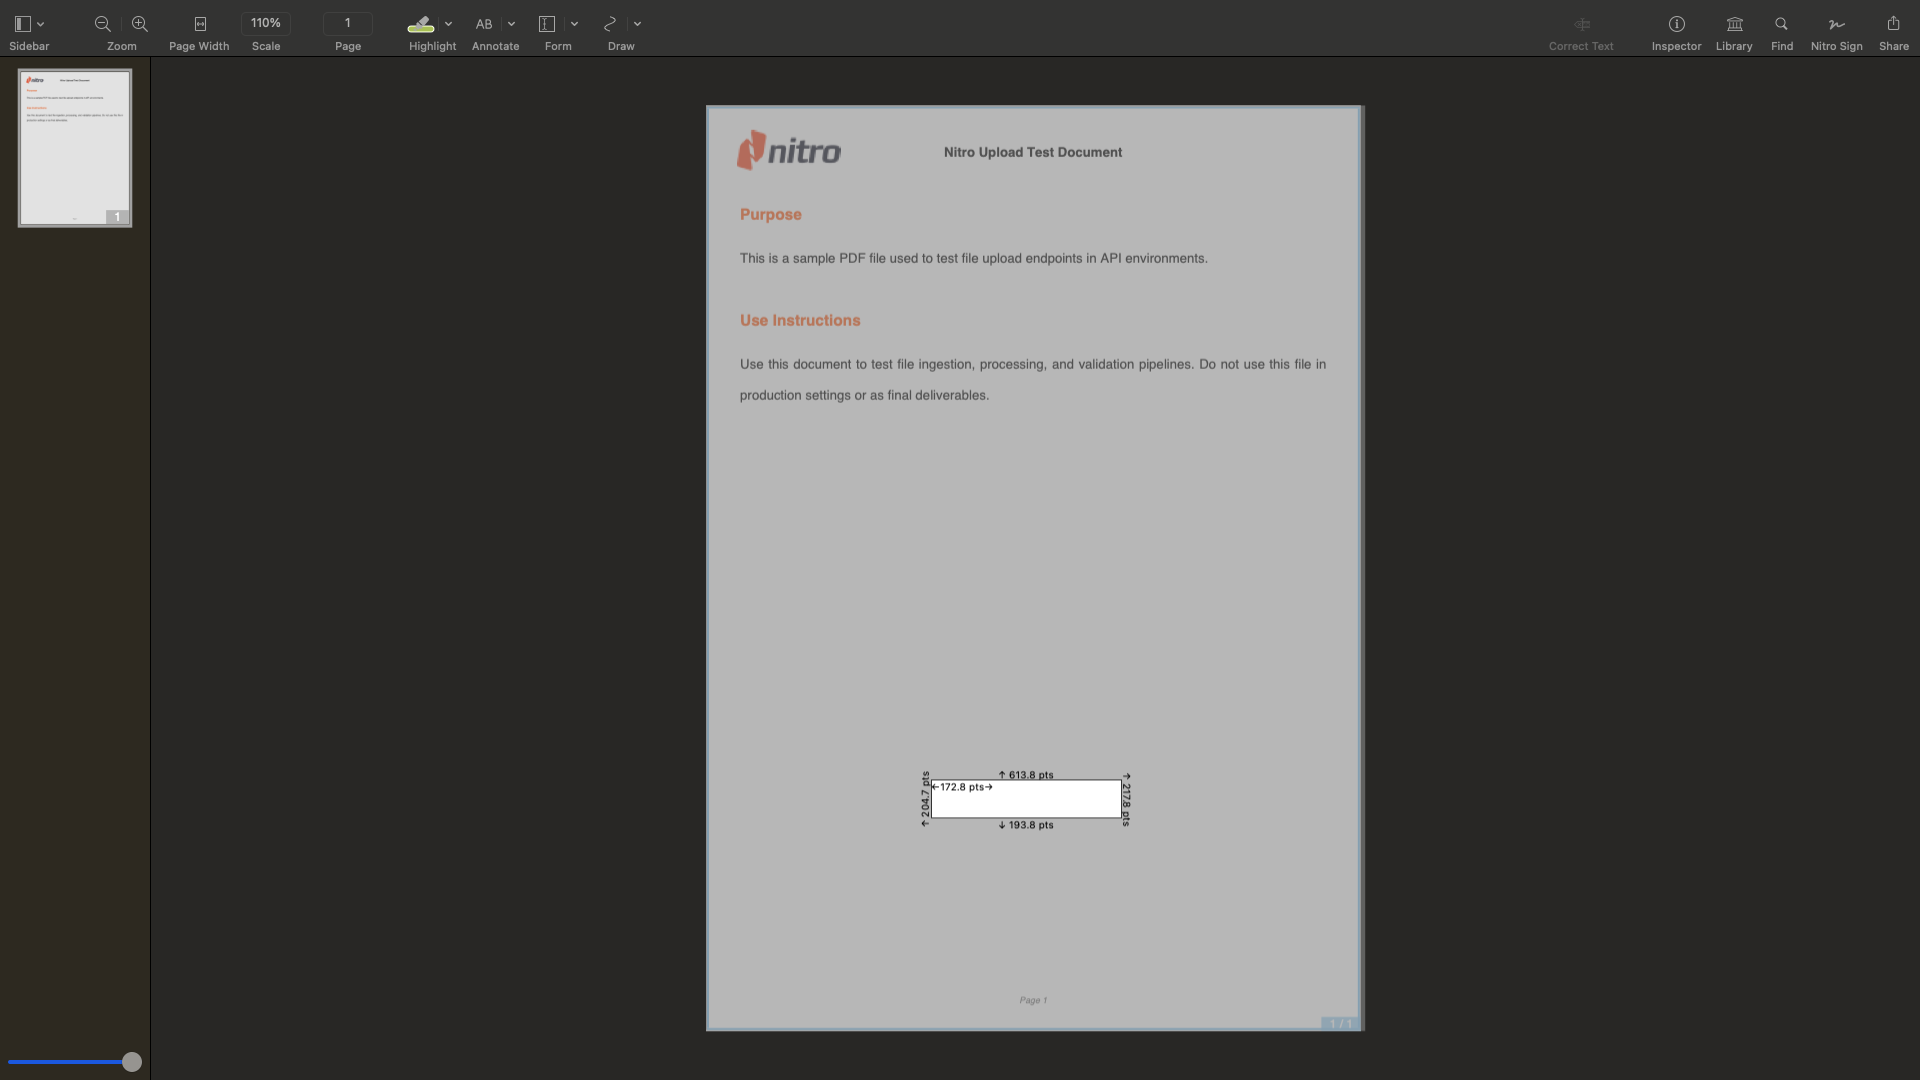 When you draw a box with the Nitro PDF **Select Rectangle** tool, it will display a series of measurements.
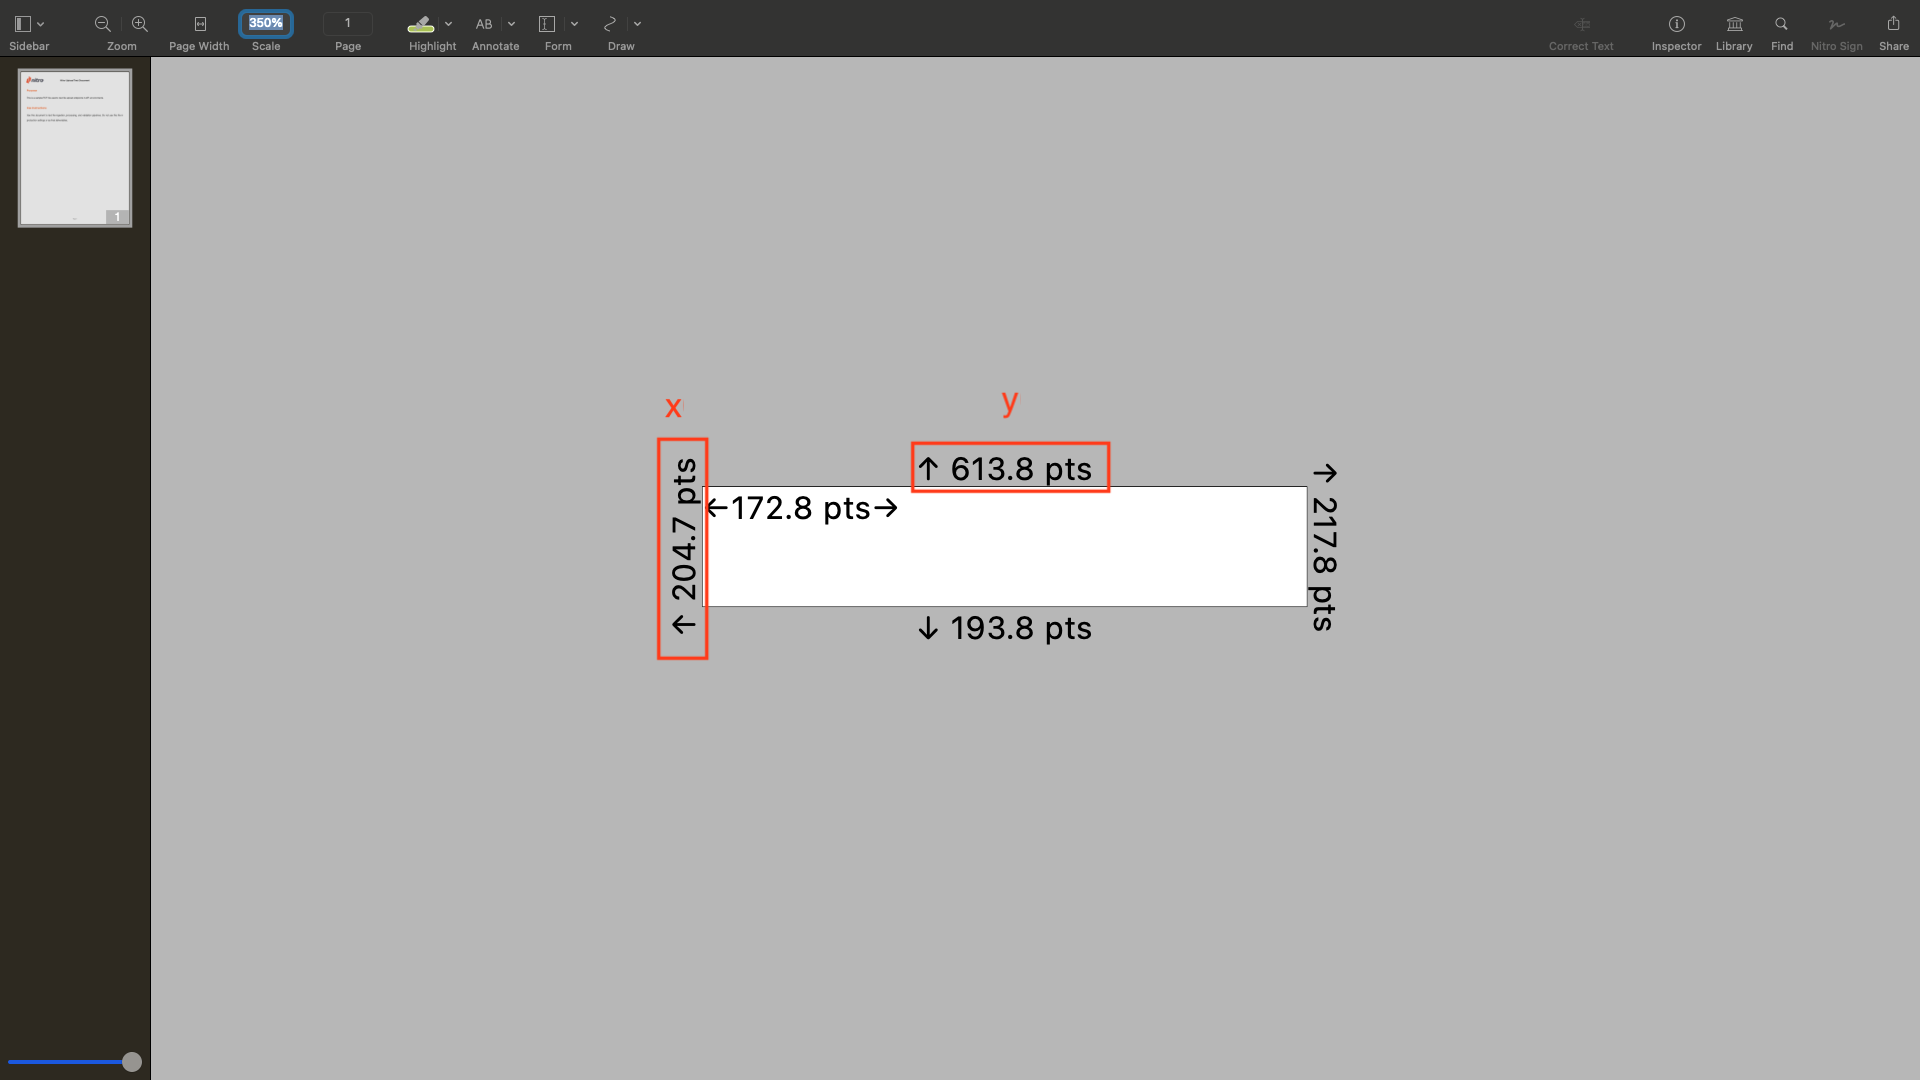
The zoomed-in view below shows an example of these values.
To obtain the first corner (`x`, `y`) of your rectangle:
* The **left-side** measurement corresponds to `x`.
* Example: `204.7 pt`
* The **top-side** measurement corresponds to `y`.
* Example: `613.8 pt`
When you draw a box with the Nitro PDF **Select Rectangle** tool, it will display a series of measurements.
The zoomed-in view below shows an example of these values.
To obtain the first corner (`x`, `y`) of your rectangle:
* The **left-side** measurement corresponds to `x`.
* Example: `204.7 pt`
* The **top-side** measurement corresponds to `y`.
* Example: `613.8 pt`
 Using the same measurements from the **Select Rectangle** tool, we can calculate the size of the rectangle.
* First, note the **right-side** measurement of the rectangle. This is the distance from the rectangle to the right edge of the document.
* Example: `217.8 pt`
* Next, note the **bottom-side** measurement of the rectangle. This is the distance from the rectangle to the bottom edge of the document.
* Example: `193.8 pt`
Now, calculate the width and height:
* **Formula for `w`:**
`w = Document Width − Right-side distance - Left-Side distance`
* `w = 595.3 pt − 217.8 pt - 204.7 pt`
* `w = 172.8 pt`
* **Formula for `h`:**
`h = Document Height − Bottom-side distance - Top-side distance`
* `h = 841.9 pt − 193.8 pt - 613.8`
* `h = 34.3 pt`
Using the same measurements from the **Select Rectangle** tool, we can calculate the size of the rectangle.
* First, note the **right-side** measurement of the rectangle. This is the distance from the rectangle to the right edge of the document.
* Example: `217.8 pt`
* Next, note the **bottom-side** measurement of the rectangle. This is the distance from the rectangle to the bottom edge of the document.
* Example: `193.8 pt`
Now, calculate the width and height:
* **Formula for `w`:**
`w = Document Width − Right-side distance - Left-Side distance`
* `w = 595.3 pt − 217.8 pt - 204.7 pt`
* `w = 172.8 pt`
* **Formula for `h`:**
`h = Document Height − Bottom-side distance - Top-side distance`
* `h = 841.9 pt − 193.8 pt - 613.8`
* `h = 34.3 pt`
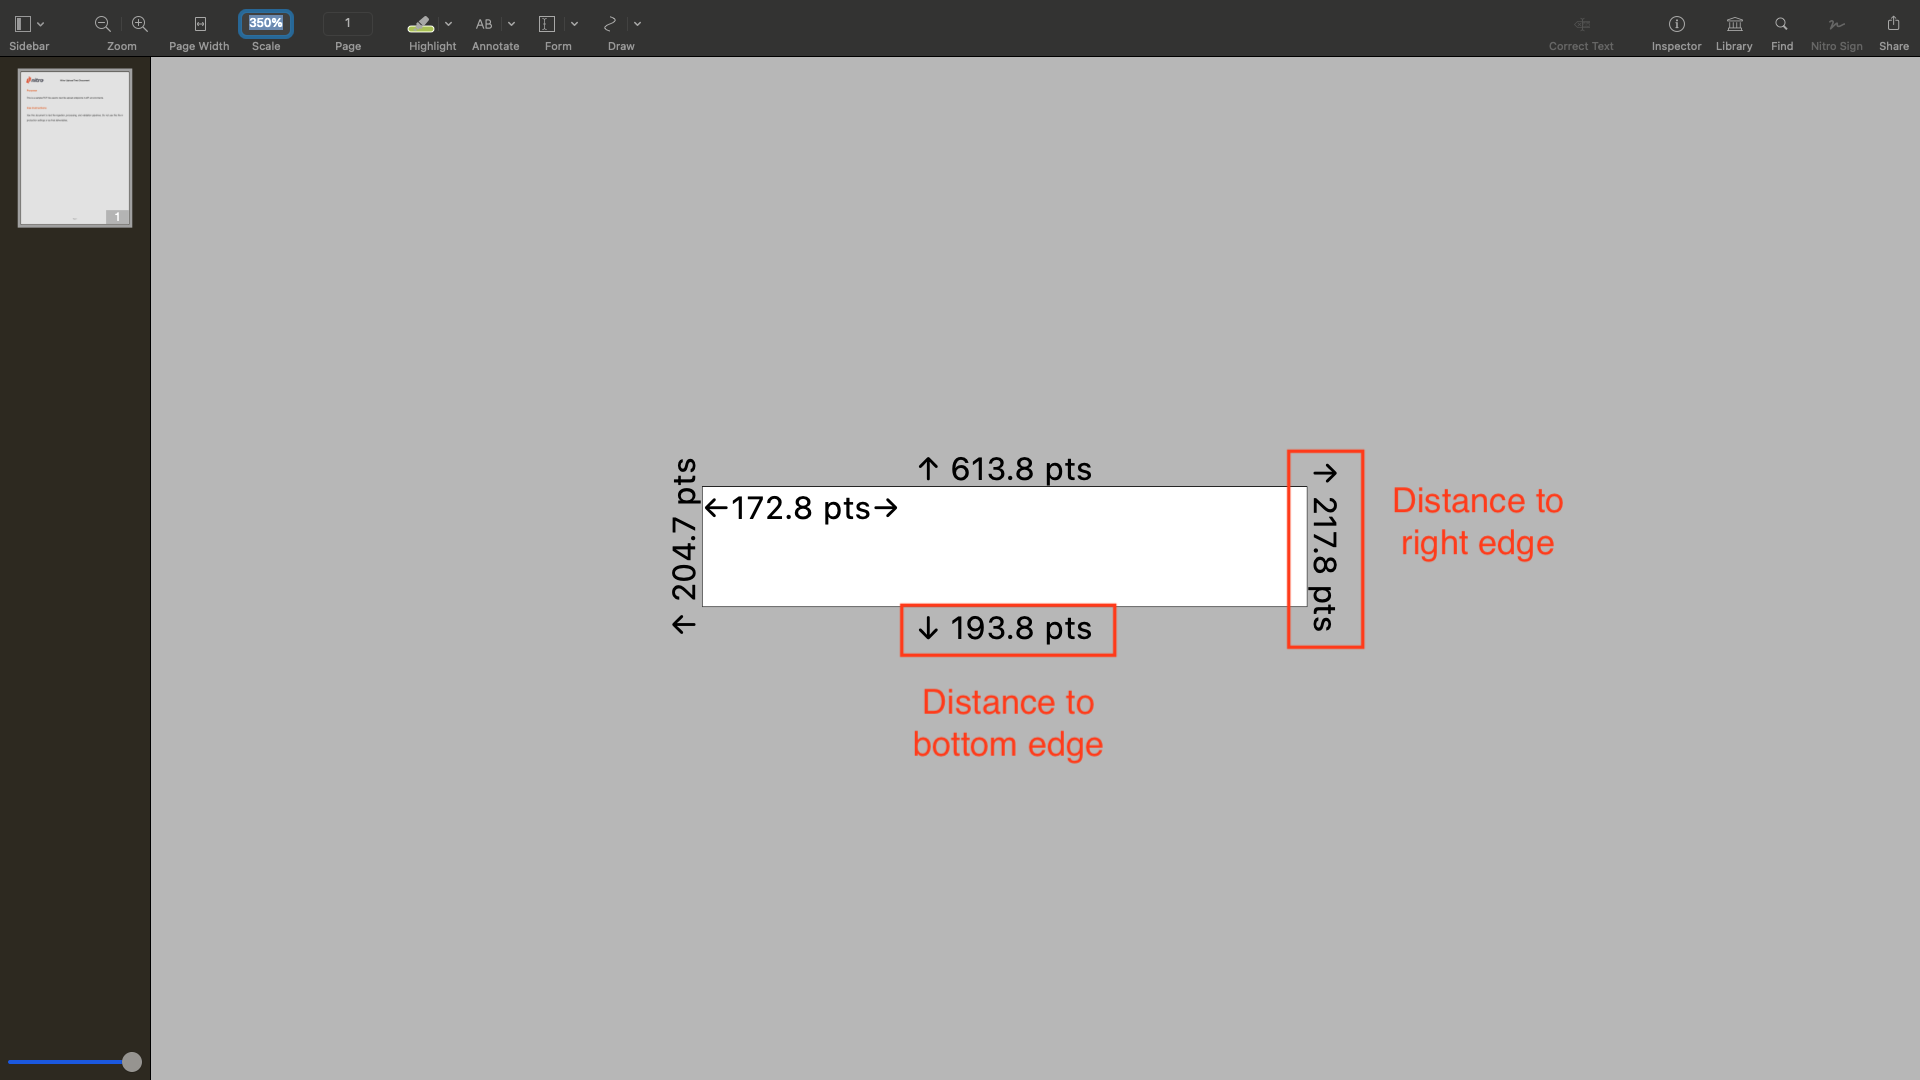 Nitro PDF Pro displays the width and height along the inside edges of the rectangle, as long as the rectangle is large enough to show them.
Given the measurements from the example above, the bounding box array to use in the **Create Field** API call is:
```json theme={null}
"boundingBox": [204.7, 613.8, 172.8, 34.3]
```
**Preview** is the built-in image viewer for macOS that allows you to easily identify point coordinates.
For this example, we’ll use **Preview** on macOS (Version 11, build 1069). Keep in mind that behavior may vary across different software versions.
Open **Preview** and click the **Info** icon .
In the floating menu, select the **Crop** tool .
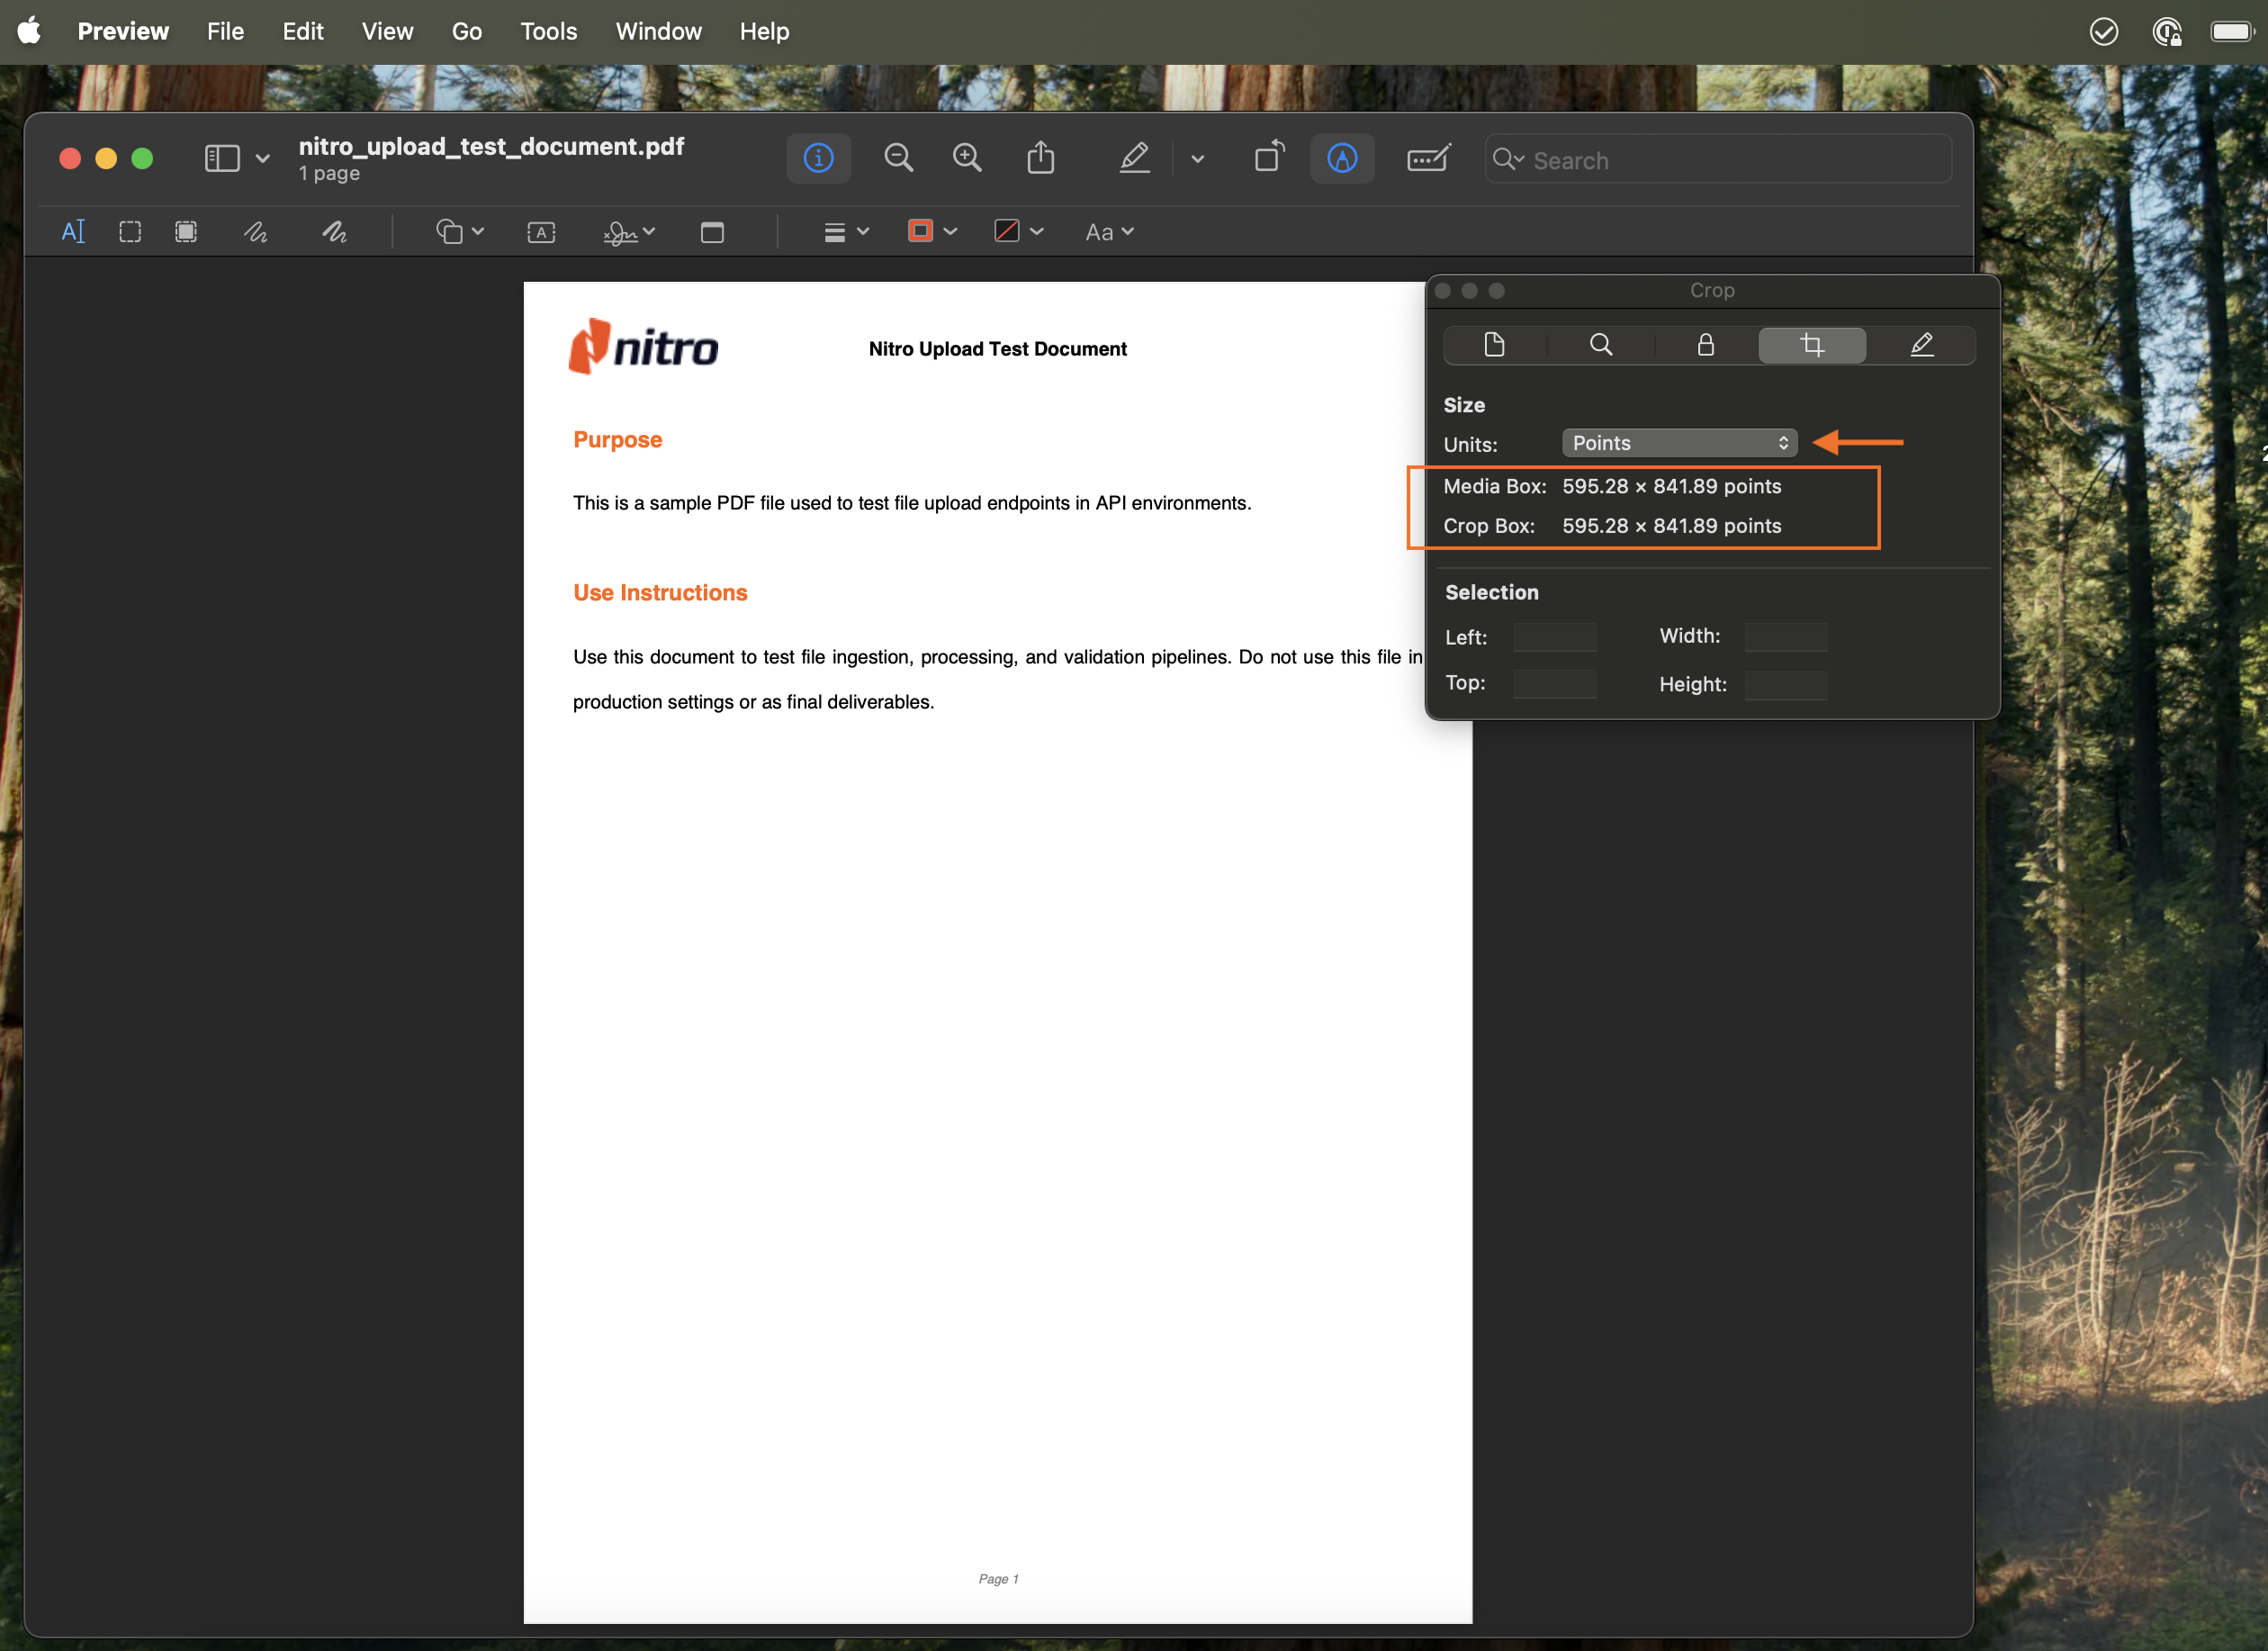
In the floating window:
* Select **Points** as the measuring unit from the dropdown.
* Note the document size displayed under **Media Box**.
Nitro PDF Pro displays the width and height along the inside edges of the rectangle, as long as the rectangle is large enough to show them.
Given the measurements from the example above, the bounding box array to use in the **Create Field** API call is:
```json theme={null}
"boundingBox": [204.7, 613.8, 172.8, 34.3]
```
**Preview** is the built-in image viewer for macOS that allows you to easily identify point coordinates.
For this example, we’ll use **Preview** on macOS (Version 11, build 1069). Keep in mind that behavior may vary across different software versions.
Open **Preview** and click the **Info** icon .
In the floating menu, select the **Crop** tool .
In the floating window:
* Select **Points** as the measuring unit from the dropdown.
* Note the document size displayed under **Media Box**.
 Decide where in the document you want the field to be placed, then use the **Crop** tool to draw a box in that area.
Next, go to **Info → Crop** window again.
* In the **Selection** section of the floating menu, note the **top** and **left** measurements. These values will serve as the starting coordinates of your field `x, y`.
* Note the Width and Height `w, h`
Decide where in the document you want the field to be placed, then use the **Crop** tool to draw a box in that area.
Next, go to **Info → Crop** window again.
* In the **Selection** section of the floating menu, note the **top** and **left** measurements. These values will serve as the starting coordinates of your field `x, y`.
* Note the Width and Height `w, h`
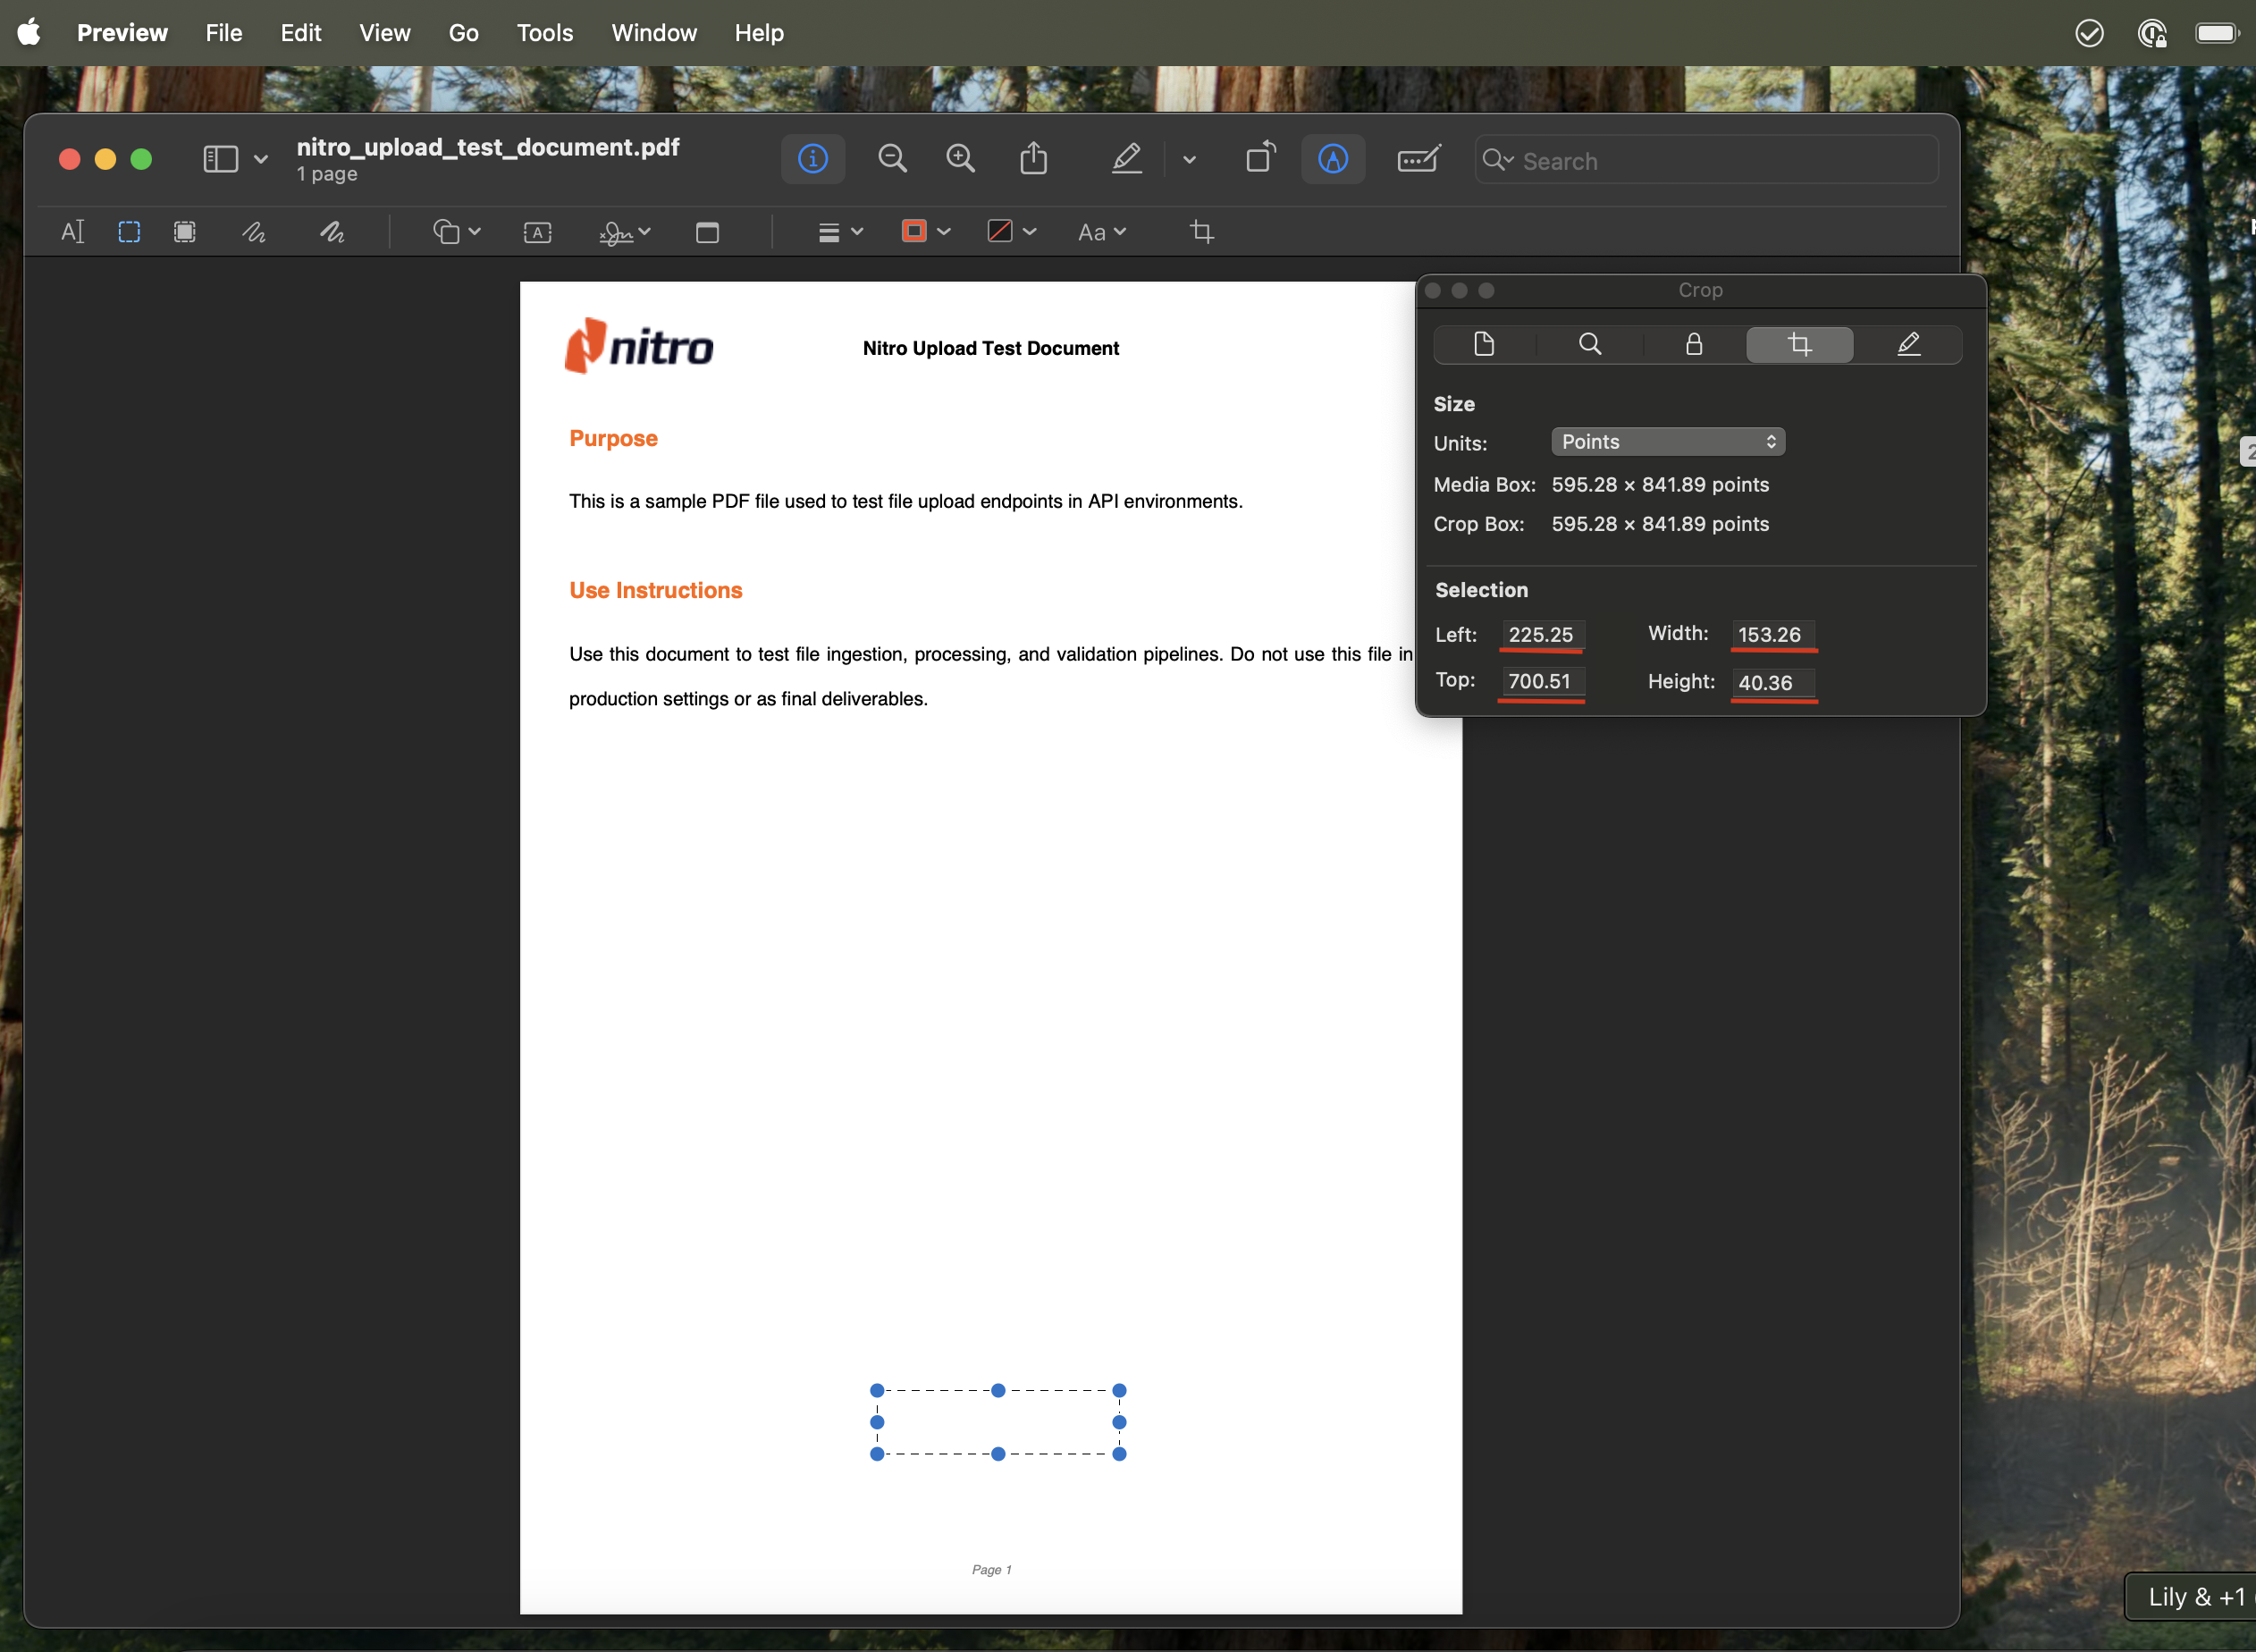 ```text theme={null}
Example:
x: **225.25**
y: **700.51**
w: **153.26**
h: **40.36**
```
Use the measurements above to construct your bounding box array.
The bounding box parameter will look like this:
```json theme={null}
"boundingBox": [225.25, 700.51, 153.26, 40.36]
```
```text theme={null}
Example:
x: **225.25**
y: **700.51**
w: **153.26**
h: **40.36**
```
Use the measurements above to construct your bounding box array.
The bounding box parameter will look like this:
```json theme={null}
"boundingBox": [225.25, 700.51, 153.26, 40.36]
```